Package Contents
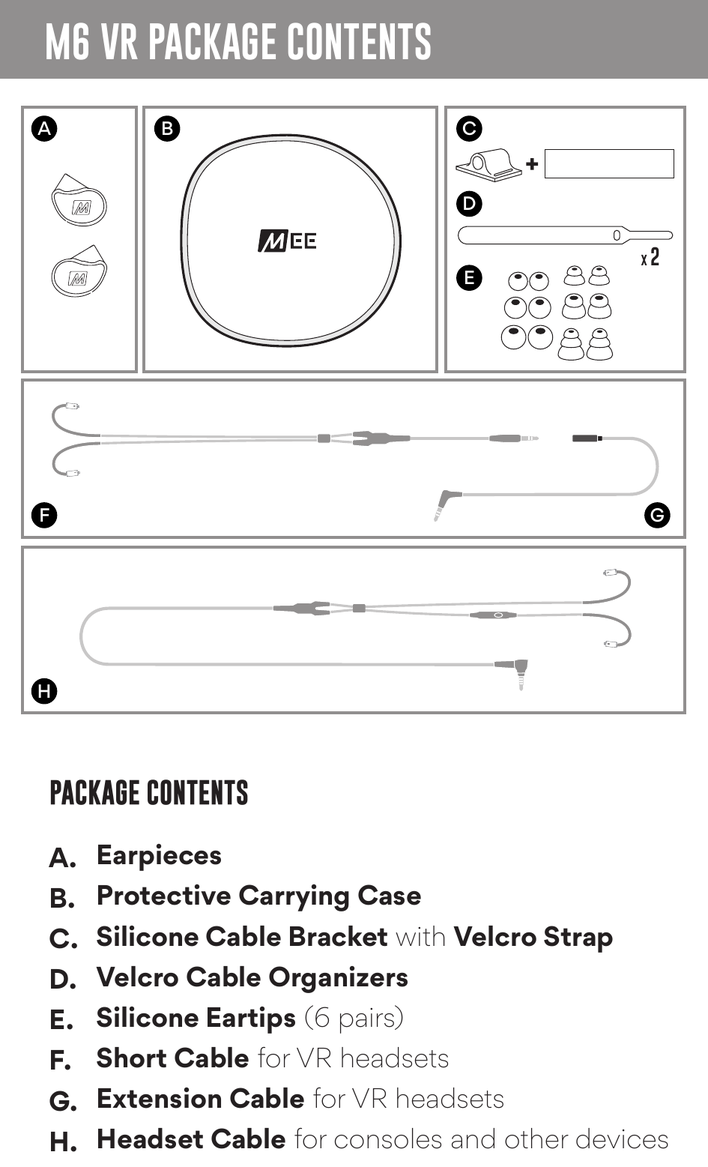
- A. Earpieces
- B. Protective Carrying Case
- C. Silicone Cable Bracket with Velcro Strap
- D. Velcro Cable Organizers
- E. Silicone Eartips (6 pairs)
- F. Short Cable for VR headsets
- G. Extension Cable for VR headsets
- H. Headset Cable for consoles and other devices
Eartip Selection
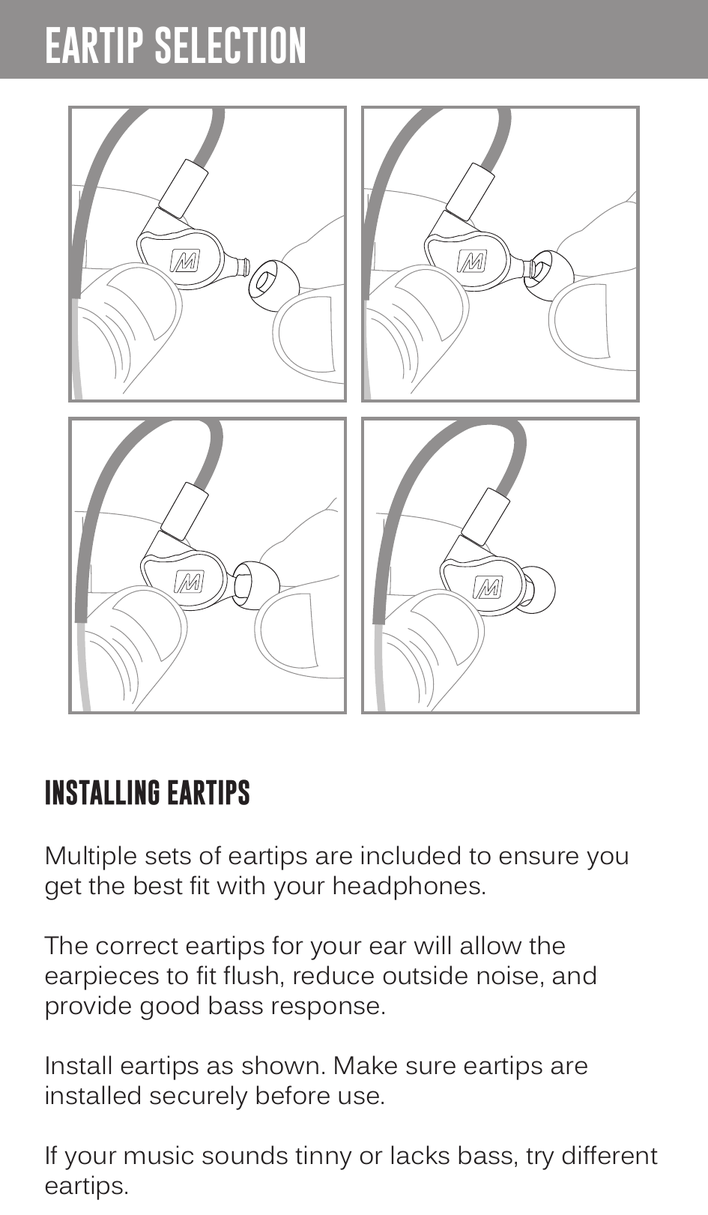
Installing Eartips
Multiple sets of eartips are included to ensure you get the best fit with your headphones.
The correct eartips for your ear will allow the earpieces to fit flush, reduce outside noise, and provide good bass response.
Install eartips as shown. Make sure eartips are installed securely before use.
If your music sounds tinny or lacks bass, try different eartips.
↑ Back to topInstallation for VR Headset: Overview
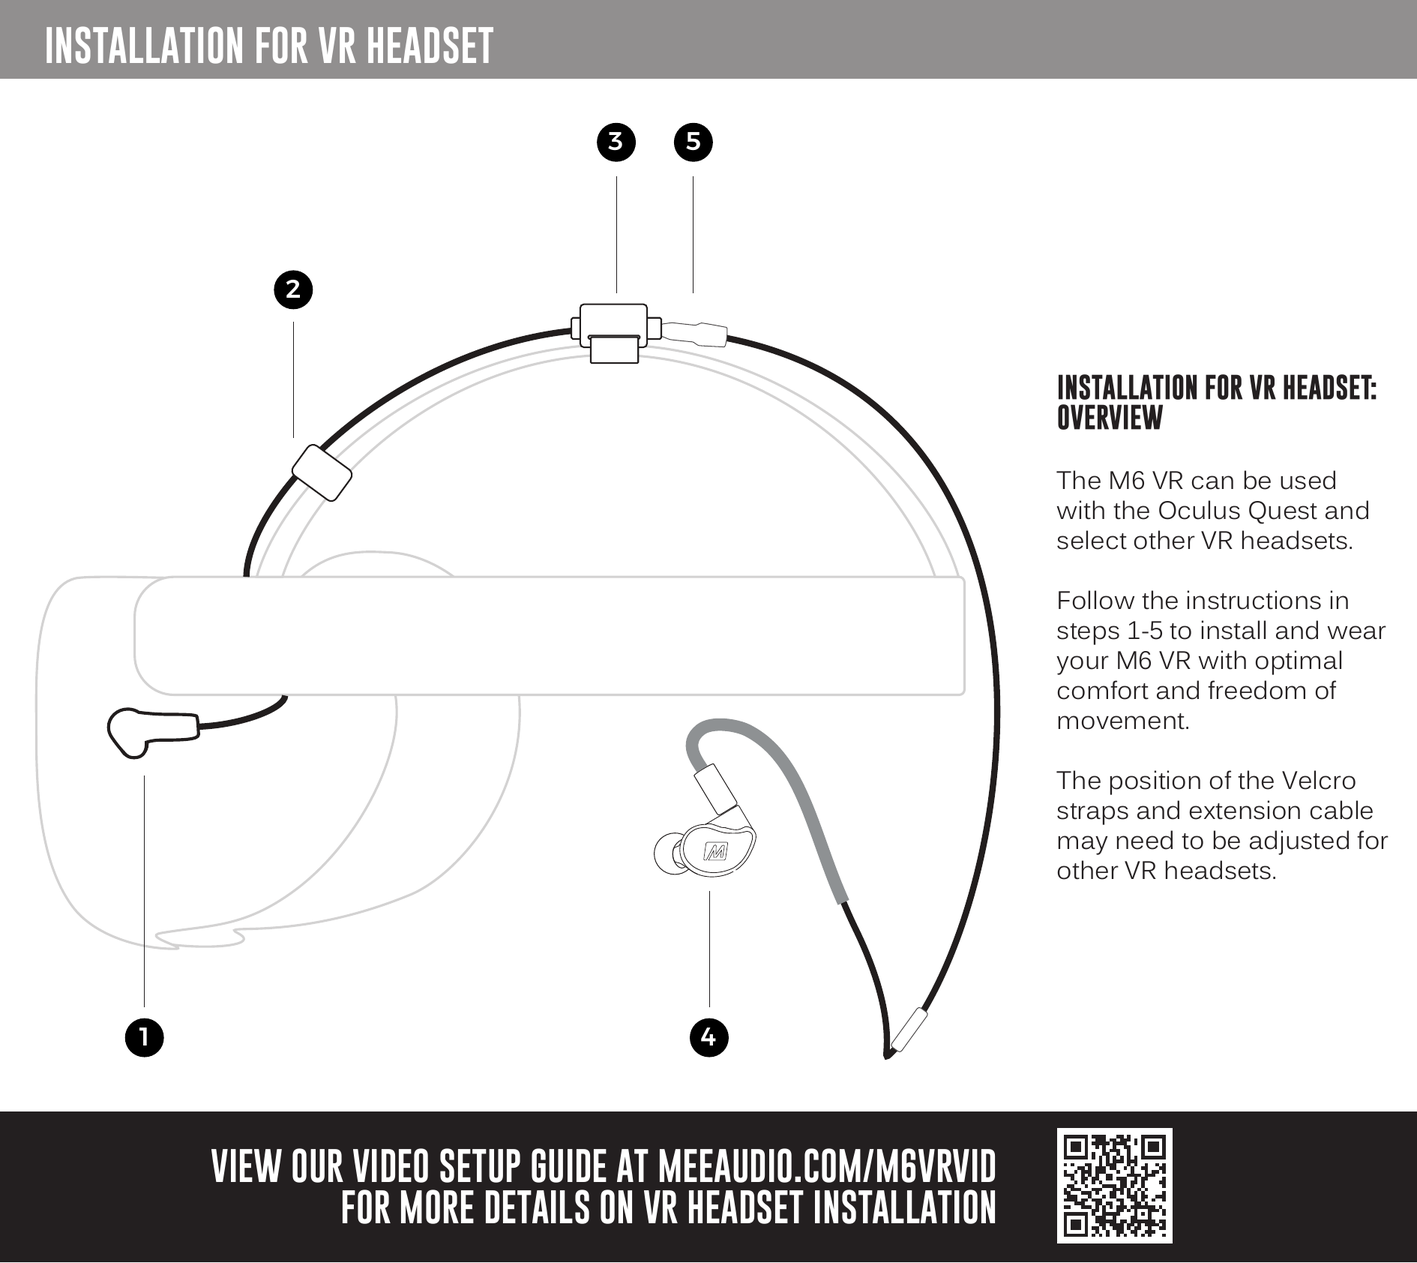
The M6 VR can be used with the Oculus Quest and select other VR headsets. Follow the instructions in steps 1–5 to install and wear your M6 VR with optimal comfort and freedom of movement.
The position of the Velcro straps and extension cable may need to be adjusted for other VR headsets.
View our video setup guide at MEEaudio.com/M6VRVid for more details on VR headset installation.
↑ Back to topStep 1: Installing the Extension Cable
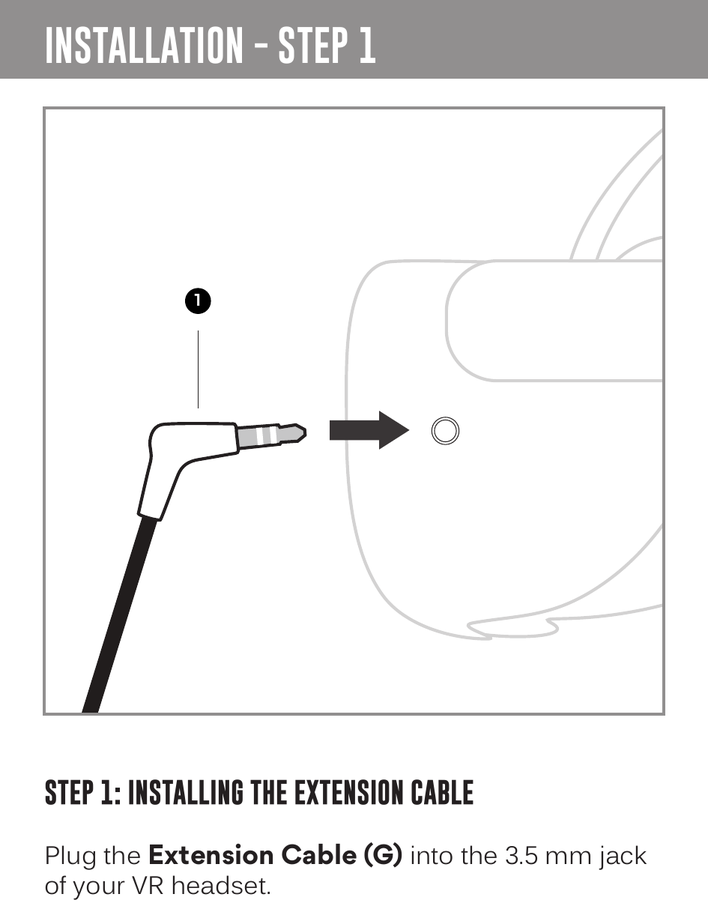
Plug the Extension Cable (G) into the 3.5 mm jack of your VR headset.
↑ Back to topStep 2: Securing the Extension Cable
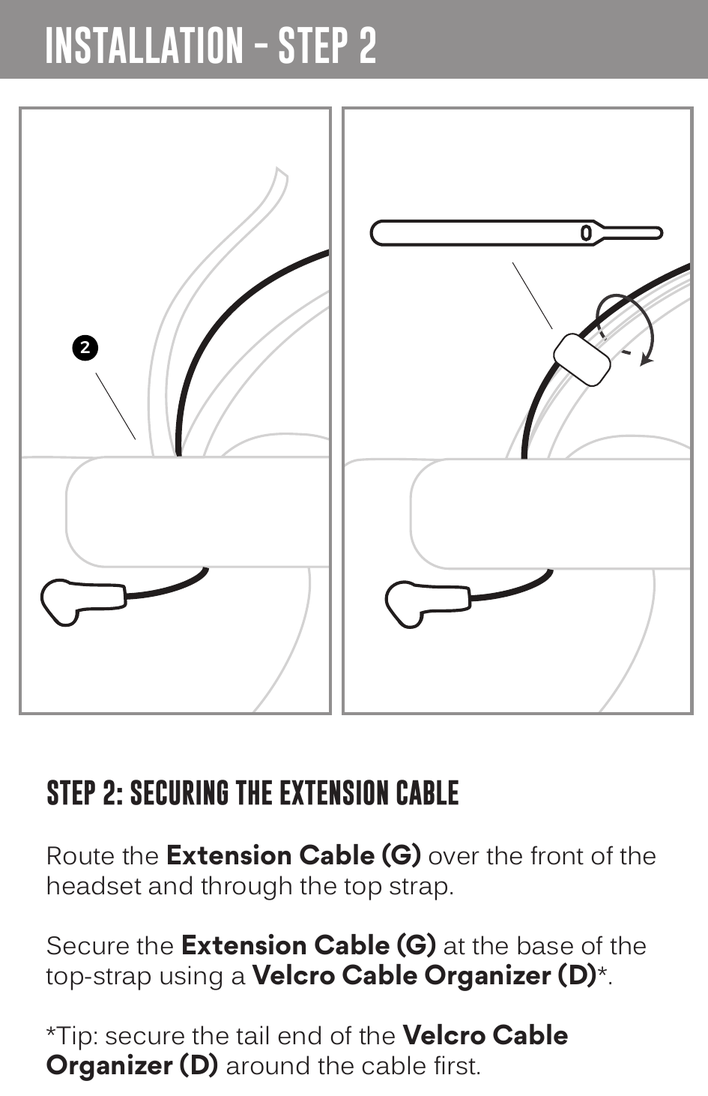
Route the Extension Cable (G) over the front of the headset and through the top strap.
Secure the Extension Cable (G) at the base of the top strap using a Velcro Cable Organizer (D).
Tip: Secure the tail end of the Velcro Cable Organizer (D) around the cable first.
↑ Back to topStep 3: Mounting the Cable Bracket
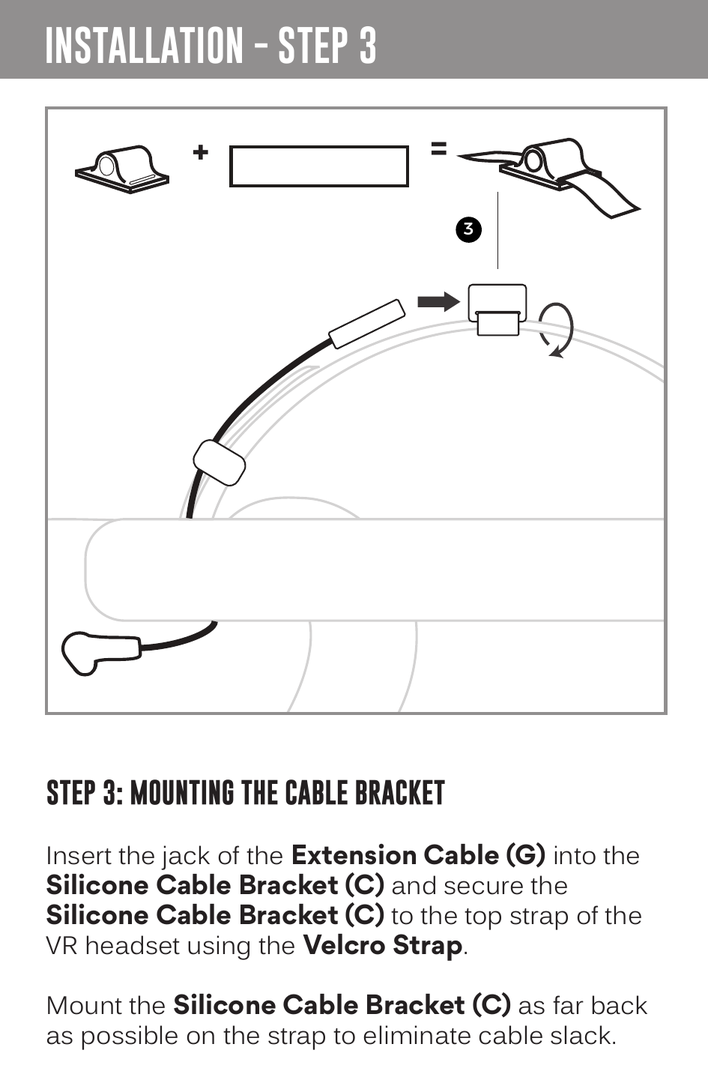
Insert the jack of the Extension Cable (G) into the Silicone Cable Bracket (C) and secure the Silicone Cable Bracket (C) to the top strap of the VR headset using the Velcro Strap.
Mount the Silicone Cable Bracket (C) as far back as possible on the strap to eliminate cable slack.
↑ Back to topStep 4: Wearing the M6 VR In-Ears
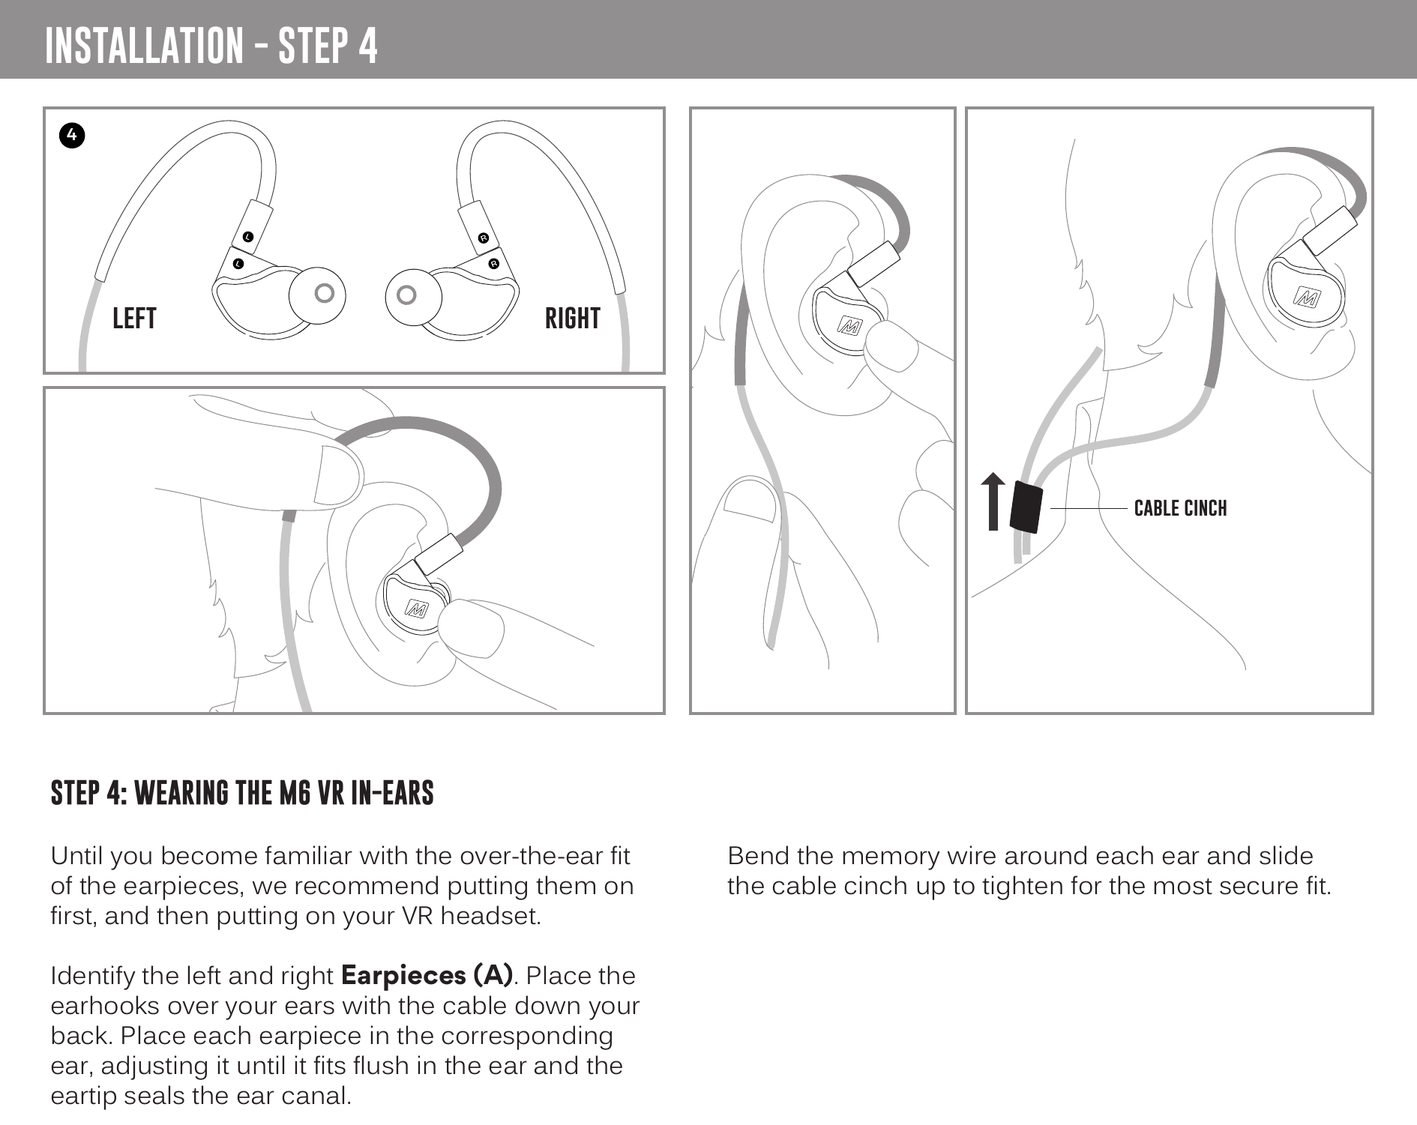
Until you become familiar with the over-the-ear fit of the earpieces, we recommend putting them on first, and then putting on your VR headset.
Identify the left and right Earpieces (A). Place the earhooks over your ears with the cable down your back. Place each earpiece in the corresponding ear, adjusting it until it fits flush in the ear and the eartip seals the ear canal.
Bend the memory wire around each ear and slide the cable cinch up to tighten for the most secure fit.
↑ Back to topStep 5: Connecting the Short Cable
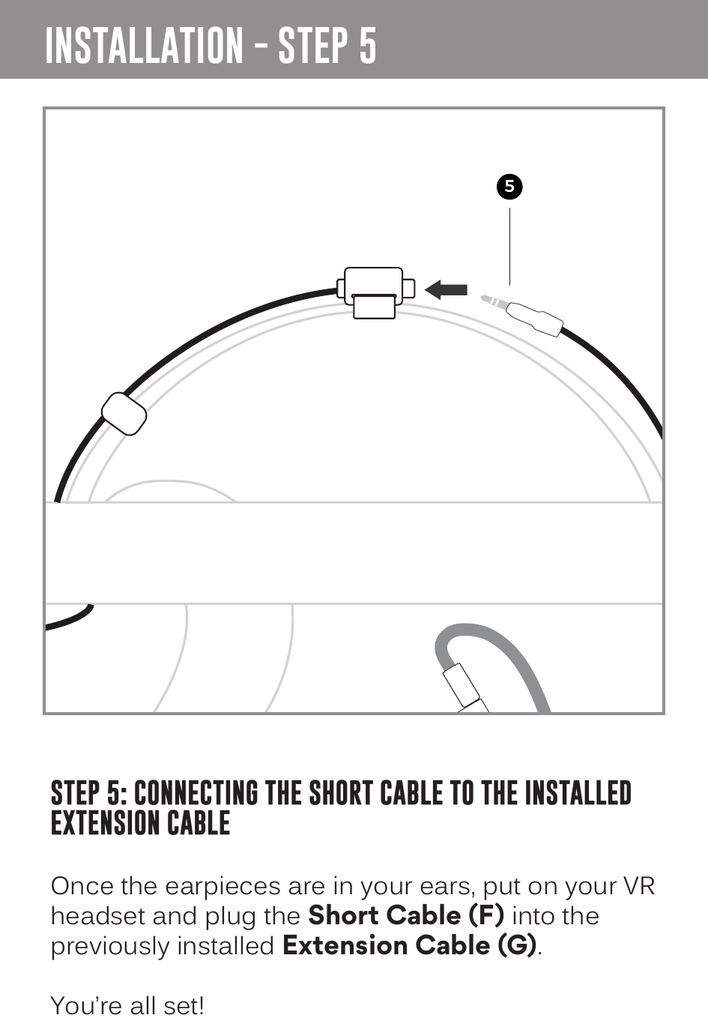
Once the earpieces are in your ears, put on your VR headset and plug the Short Cable (F) into the previously installed Extension Cable (G).
You're all set!
↑ Back to topUse with Other Devices
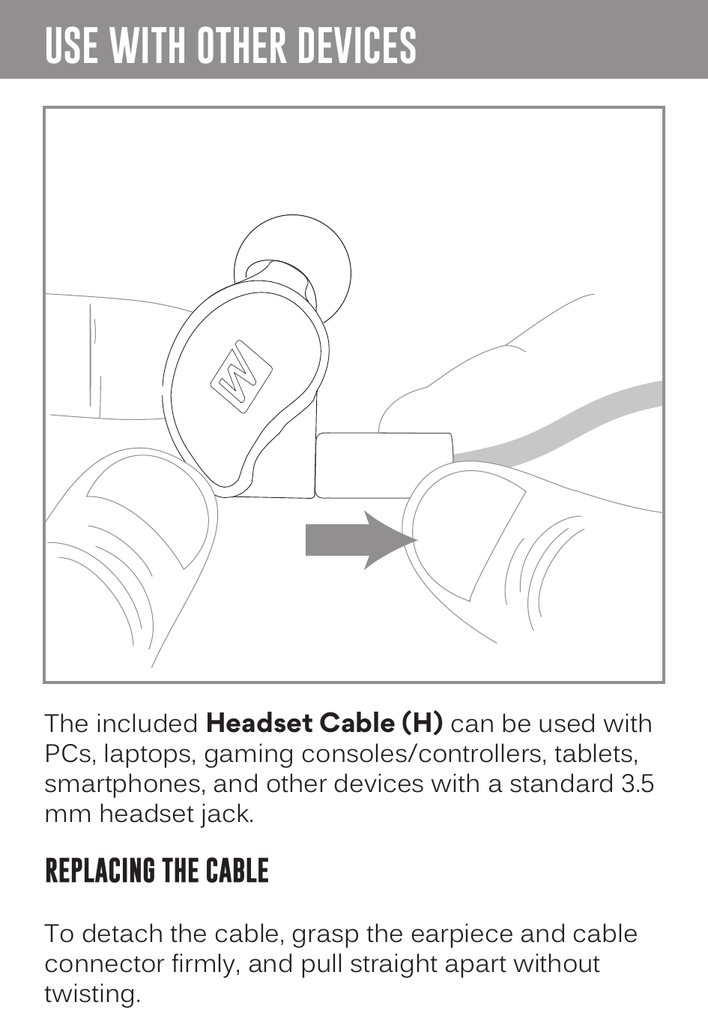
The included Headset Cable (H) can be used with PCs, laptops, gaming consoles/controllers, tablets, smartphones, and other devices with a standard 3.5 mm headset jack.
Detaching the Cable
To detach the cable, grasp the earpiece and cable connector firmly, and pull straight apart without twisting.
↑ Back to topReplacing the Cable
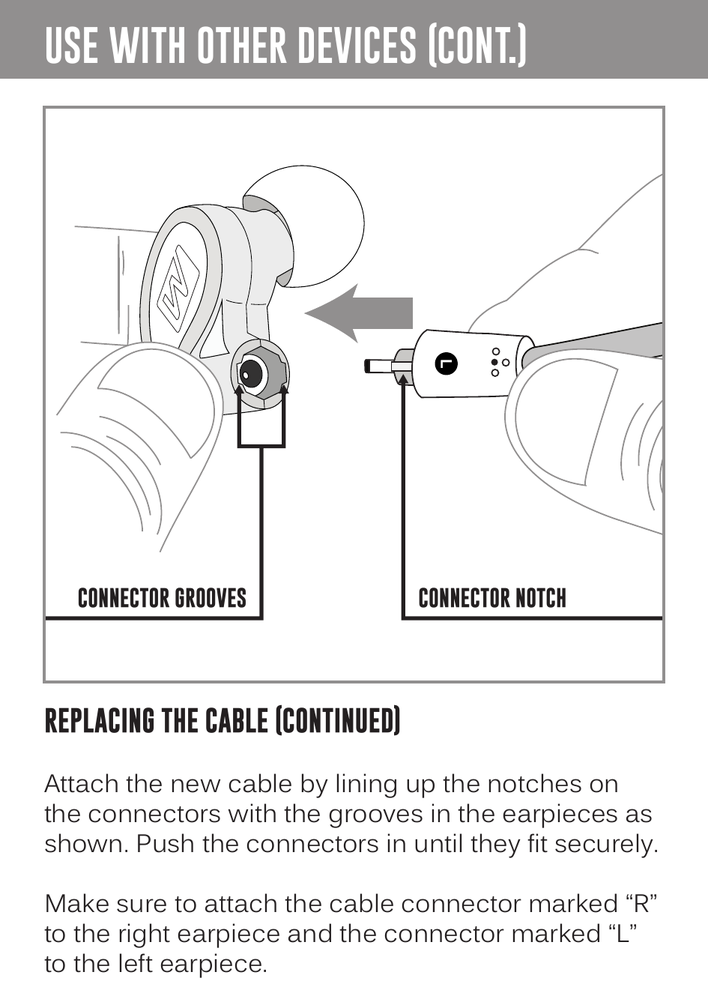
Attach the new cable by lining up the notches on the connectors with the grooves in the earpieces as shown. Push the connectors in until they fit securely.
Make sure to attach the cable connector marked "R" to the right earpiece and the connector marked "L" to the left earpiece.
↑ Back to topHow to Wear the Headset Cable
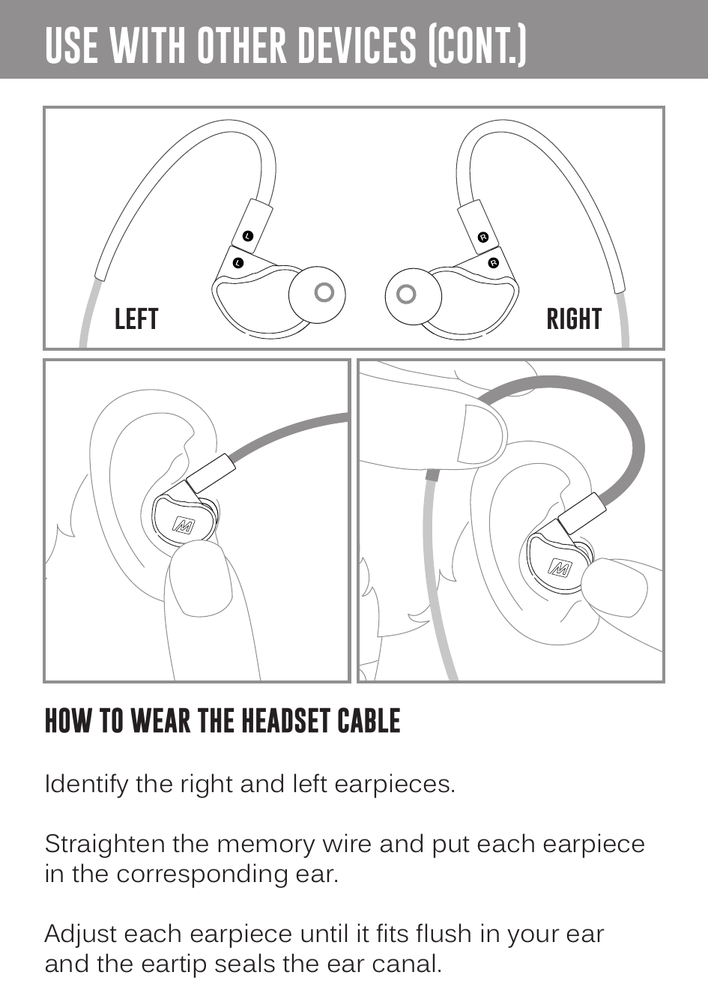
Identify the right and left earpieces. Straighten the memory wire and put each earpiece in the corresponding ear.
Adjust each earpiece until it fits flush in your ear and the eartip seals the ear canal.

Holding the earpiece in place, bend the memory wire around your ear to achieve a conforming fit.
While pulling the cable gently with one hand, squeeze the memory wire behind your ear with the other hand until the fit is tight and secure.
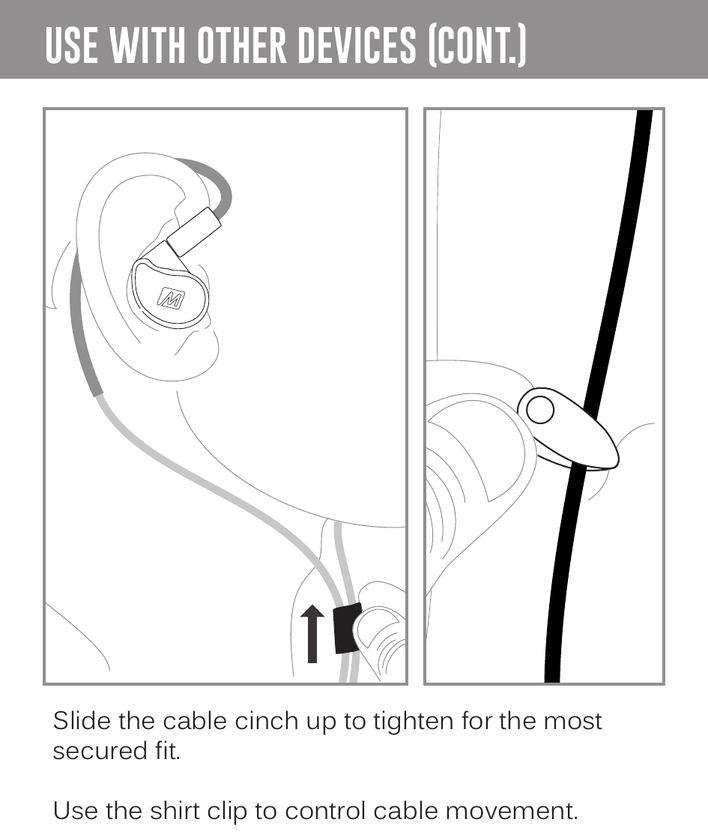
Slide the cable cinch up to tighten for the most secure fit.
Use the shirt clip to control cable movement.
↑ Back to topMicrophone & Remote Use
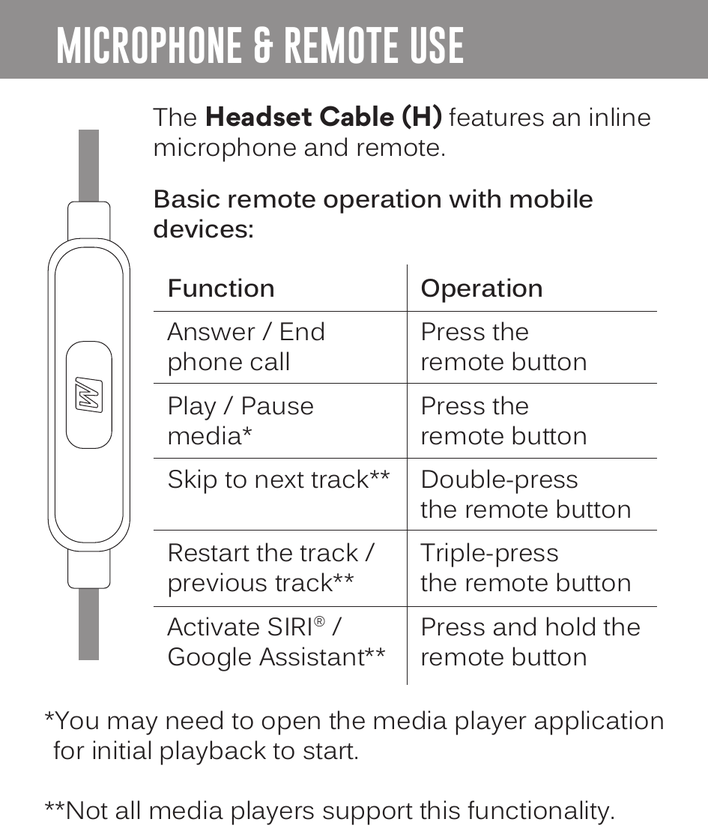
The Headset Cable (H) features an inline microphone and remote.
Basic remote operation with mobile devices:
| Function | Operation |
|---|---|
| Answer / End phone call | Press the remote button |
| Play / Pause media* | Press the remote button |
| Skip to next track** | Double-press the remote button |
| Restart the track / previous track** | Triple-press the remote button |
| Activate Siri® / Google Assistant** | Press and hold the remote button |
*You may need to open the media player application for initial playback to start.
**Not all media players support this functionality.
↑ Back to topPersonalization
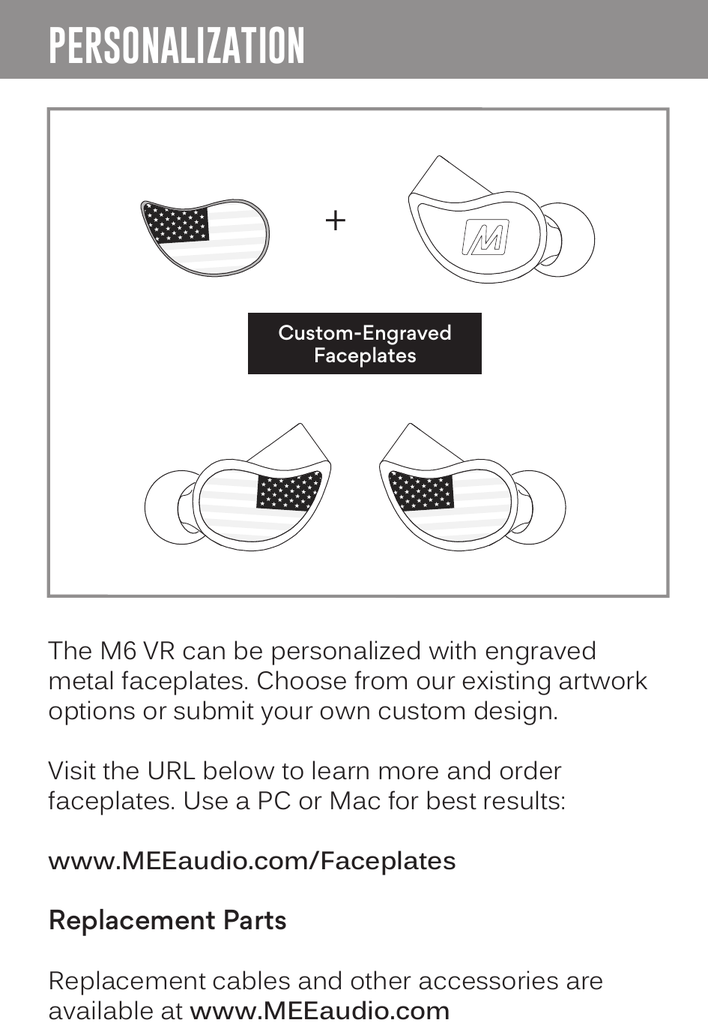
Custom-Engraved Faceplates
The M6 VR can be personalized with engraved metal faceplates. Choose from existing artwork options or submit your own custom design.
Visit the URL below to learn more and order faceplates. Use a PC or Mac for best results:
Replacement Parts
Replacement cables and other accessories are available at www.MEEaudio.com.
↑ Back to topAdditional Support
Warranty
MEE audio products purchased from authorized resellers are covered by a 1-year manufacturer warranty. For more information, contact your local MEE audio dealer or visit MEEaudio.com/support.
Disposal and Recycling
Dispose of this product in accordance with all local laws and regulations. Because this product contains electronic components, it must be disposed of separately from household waste. Contact local authorities to learn about disposal and recycling options.
Warning
Using headphones at high to moderate volumes for extended periods of time will result in permanent hearing damage. It is advised you keep volume levels moderate to low at all times for your safety. Do not use while driving a car, cycling, operating machinery, or performing other activities that require hearing surrounding sounds.
Keep the device and packaging out of reach of children.
View Our Video Setup Guide
Scan the QR code on the cover or enter the URL below into your web browser: MEEaudio.com/M6VRVid
Questions? We're Here to Help!
Phone Support: 626-965-1008
Monday – Friday, 9:00 am to 5:00 pm PST
Email Support: support@MEEaudio.com
All emails are responded to within 2 business days.
Trademarks
MEE audio and its logo are registered trademarks of S2E, Inc. All rights reserved. Microsoft and Xbox are trademarks of the Microsoft group of companies. Nintendo Switch™ is a trademark of Nintendo America Inc. Oculus and Oculus Quest are trademarks or registered trademarks of Facebook Technologies, LLC. "PlayStation", "PS5", "PS4" and "PS Vita" are registered trademarks or trademarks of Sony Interactive Entertainment Inc. ©2021 Valve Corporation. Valve Index and the Valve Index logo are trademarks and/or registered trademarks of Valve Corporation in the U.S. and/or other countries. All rights reserved.
↑ Back to top