Setup Guide
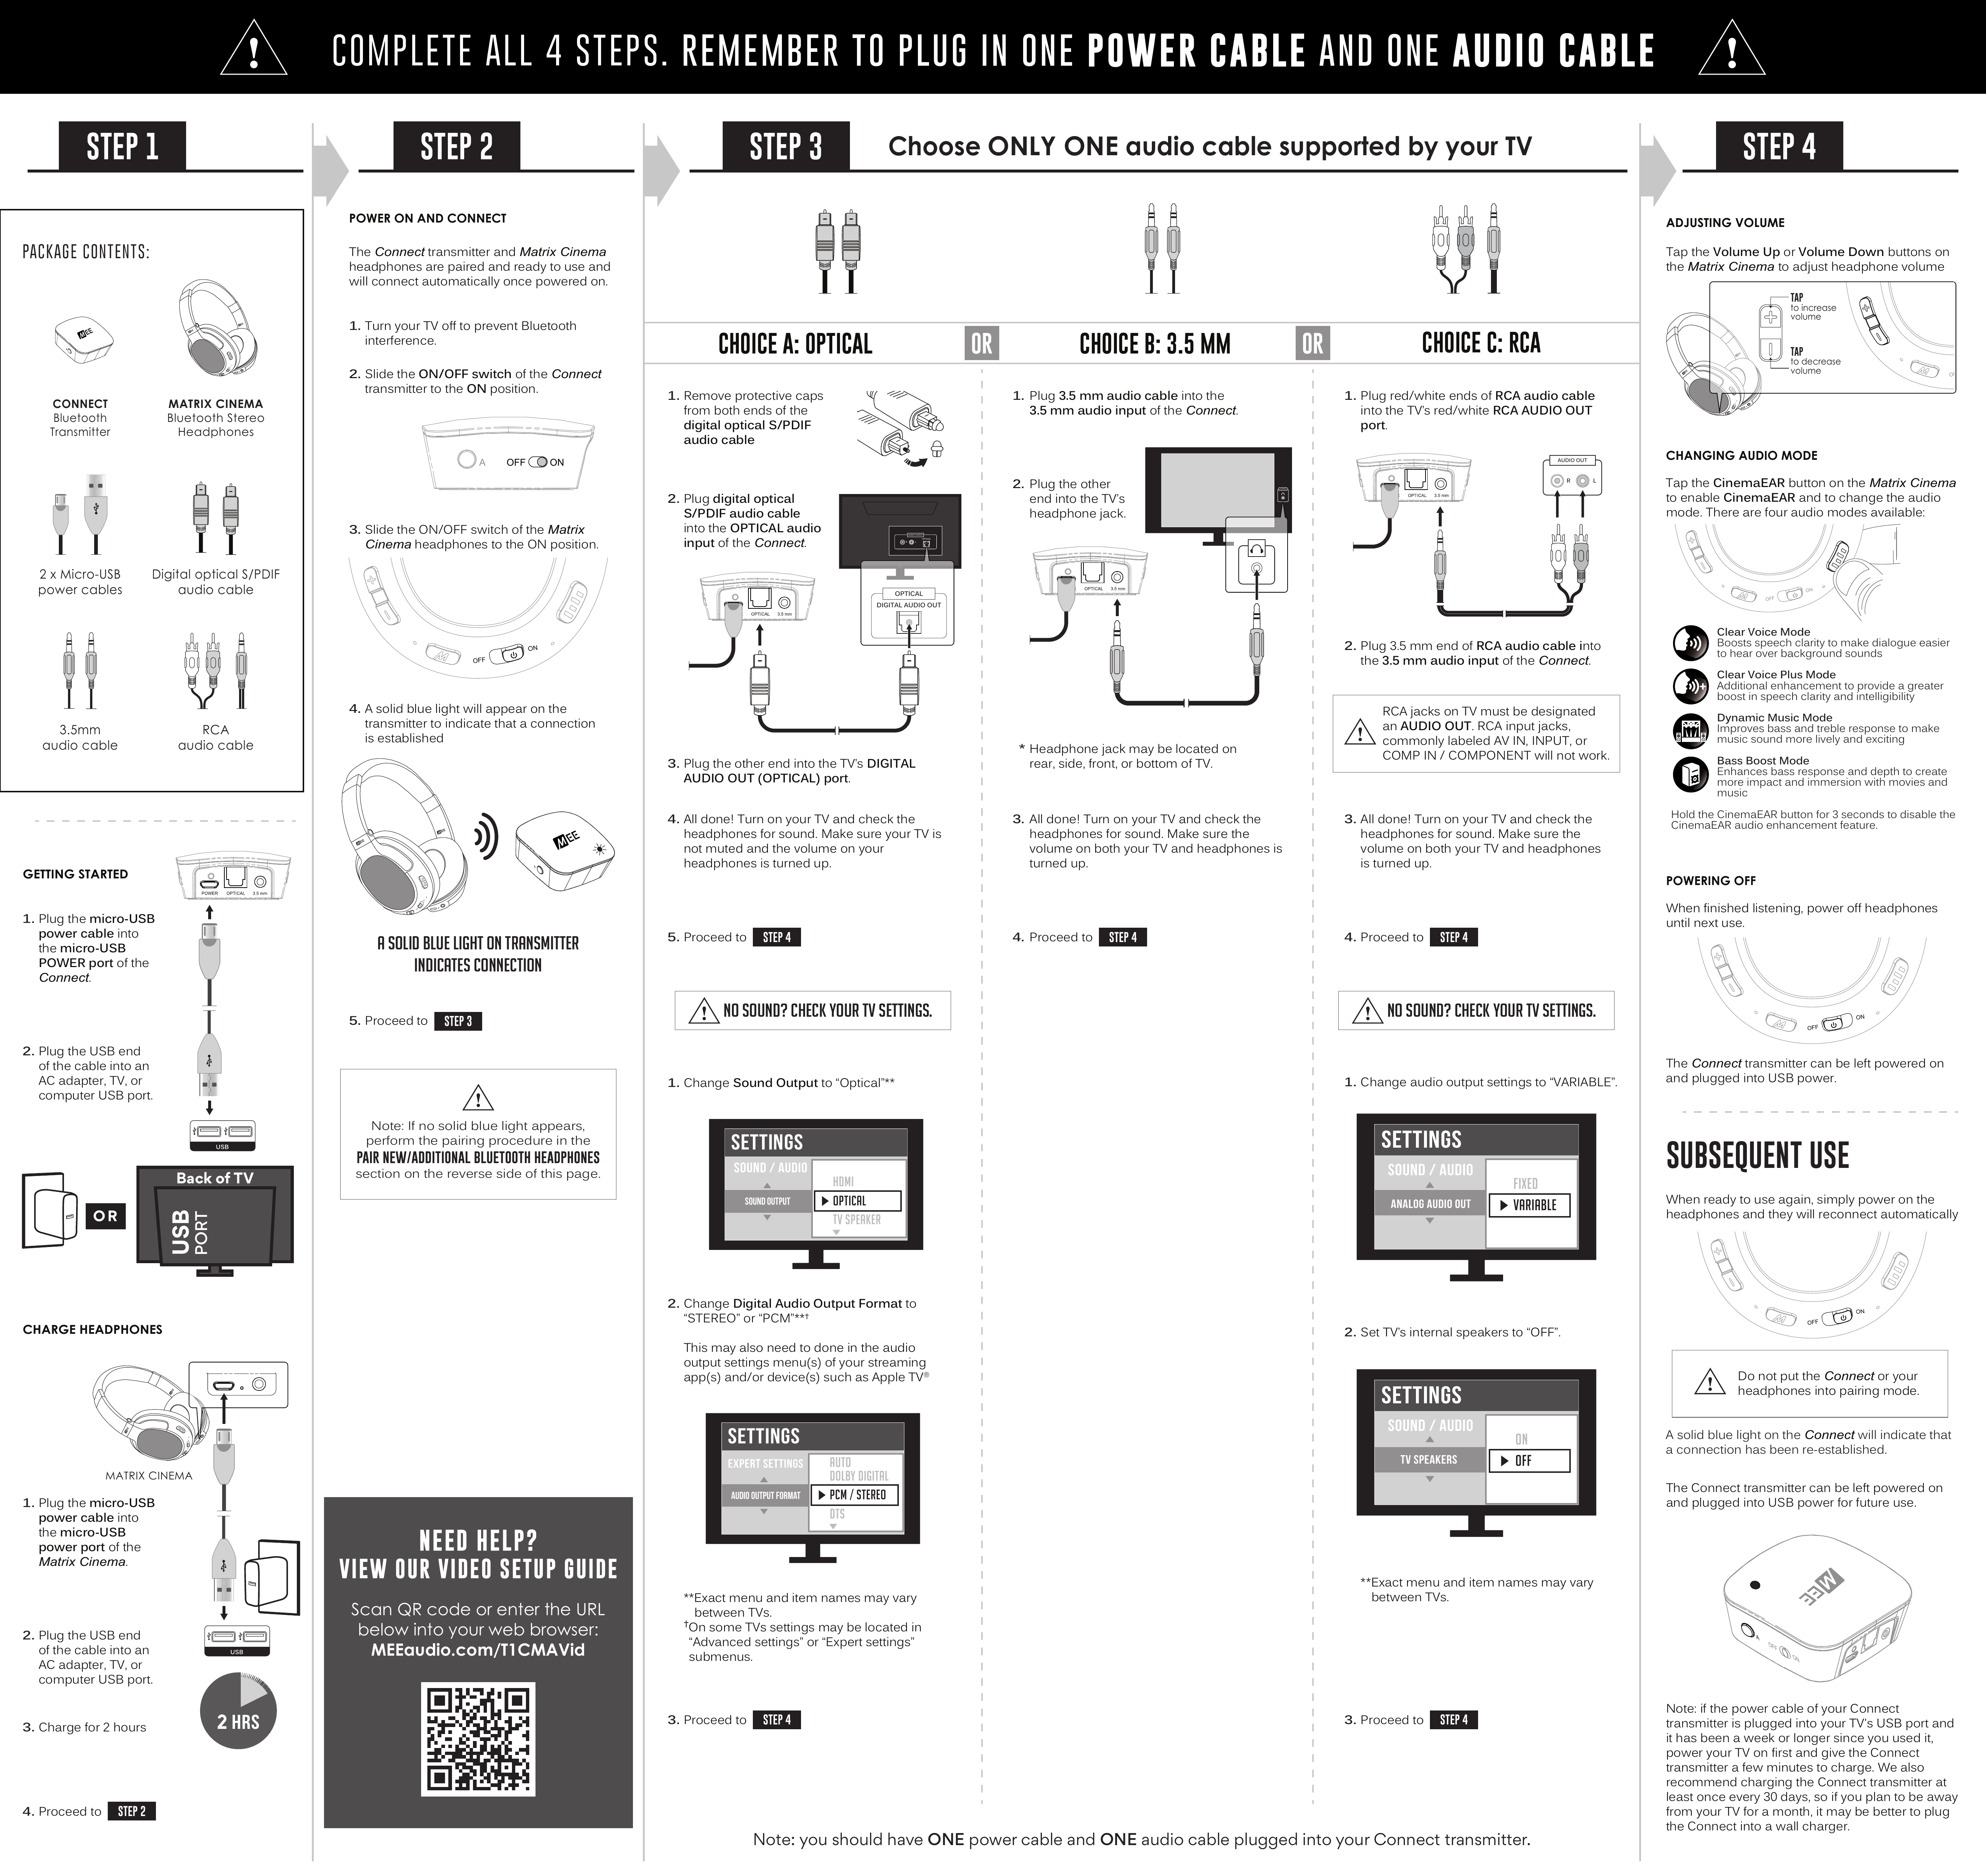
Step 1: Getting Started & Charging
Package Contents
- CONNECT Bluetooth Transmitter
- MATRIX CINEMA Bluetooth Stereo Headphones
- 2× Micro-USB Power Cables
- Digital Optical S/PDIF Audio Cable
- 3.5 mm Audio Cable
- RCA Audio Cable
Charge the Connect Transmitter
- Plug the micro-USB power cable into the micro-USB POWER port of the Connect.
- Plug the USB end of the cable into an AC adapter, TV, or computer USB port.
Charge the Matrix Cinema Headphones
- Plug the micro-USB power cable into the micro-USB power port of the Matrix Cinema.
- Plug the USB end of the cable into an AC adapter, TV, or computer USB port.
- Charge for 2 hours.
- Proceed to Step 2.
Step 2: Power On and Connect
The Connect transmitter and Matrix Cinema headphones are paired and ready to use and will connect automatically once powered on.
- Turn your TV off to prevent Bluetooth interference.
- Slide the ON/OFF switch of the Connect transmitter to the ON position.
- Slide the ON/OFF switch of the Matrix Cinema headphones to the ON position.
- A solid blue light will appear on the transmitter to indicate that a connection is established.
- Proceed to Step 3.
Note: If no solid blue light appears, perform the pairing procedure in the Pair New / Additional Bluetooth Headphones section.
Step 3: Connect Audio Cable to TV
Choose only one audio cable supported by your TV:
Choice A: Optical
- Remove protective caps from both ends of the digital optical S/PDIF audio cable.
- Plug the digital optical S/PDIF audio cable into the OPTICAL audio input of the Connect.
- Plug the other end into the TV's DIGITAL AUDIO OUT (OPTICAL) port.
- All done! Turn on your TV and check the headphones for sound. Make sure your TV is not muted and the volume on your headphones is turned up.
- Proceed to Step 4.
- Change Sound Output to "Optical."
- Change Digital Audio Output Format to "STEREO" or "PCM." This may also need to be done in the audio output settings menu(s) of your streaming app(s) and/or device(s) such as Apple TV®.
Choice B: 3.5 mm
- Plug the 3.5 mm audio cable into the 3.5 mm audio input of the Connect.
- Plug the other end into the TV's headphone jack. The headphone jack may be located on the rear, side, front, or bottom of the TV.
- All done! Turn on your TV and check the headphones for sound. Make sure the volume on both your TV and headphones is turned up.
- Proceed to Step 4.
Choice C: RCA
- Plug the red/white ends of the RCA audio cable into the TV's red/white RCA AUDIO OUT port.
- Plug the 3.5 mm end of the RCA audio cable into the 3.5 mm audio input of the Connect.
- All done! Turn on your TV and check the headphones for sound. Make sure the volume on both your TV and headphones is turned up.
- Proceed to Step 4.
- Change audio output settings to "VARIABLE."
- Set TV's internal speakers to "OFF."
Note: You should have ONE power cable and ONE audio cable plugged into your Connect transmitter.
Step 4: Adjusting Volume & Audio Modes
Adjusting Volume
Tap the Volume Up or Volume Down buttons on the Matrix Cinema to adjust headphone volume.
Changing Audio Mode (CinemaEAR)
Tap the CinemaEAR button on the Matrix Cinema to enable CinemaEAR and to change the audio mode. There are four audio modes available:
- Clear Voice Mode: Boosts speech clarity to make dialogue easier to hear over background sounds.
- Clear Voice Plus Mode: Additional enhancement to provide a greater boost in speech clarity and intelligibility.
- Dynamic Music Mode: Improves bass and treble response to make music sound more lively and exciting.
- Bass Boost Mode: Enhances bass response and depth to create more impact and immersion with movies and music.
Hold the CinemaEAR button for 3 seconds to disable the CinemaEAR audio enhancement feature.
Powering Off
When finished listening, power off headphones until next use. The Connect transmitter can be left powered on and plugged into USB power.
Subsequent Use
When ready to use again, simply power on the headphones and they will reconnect automatically. A solid blue light on the Connect will indicate that a connection has been re-established.
Note: Do not put the Connect or your headphones into pairing mode.
The Connect transmitter can be left powered on and plugged into USB power for future use.
Note: If the power cable of your Connect transmitter is plugged into your TV's USB port and it has been a week or longer since you used it, power your TV on first and give the Connect transmitter a few minutes to charge. We also recommend charging the Connect transmitter at least once every 30 days.
Connect Transmitter — Additional Information
Overview
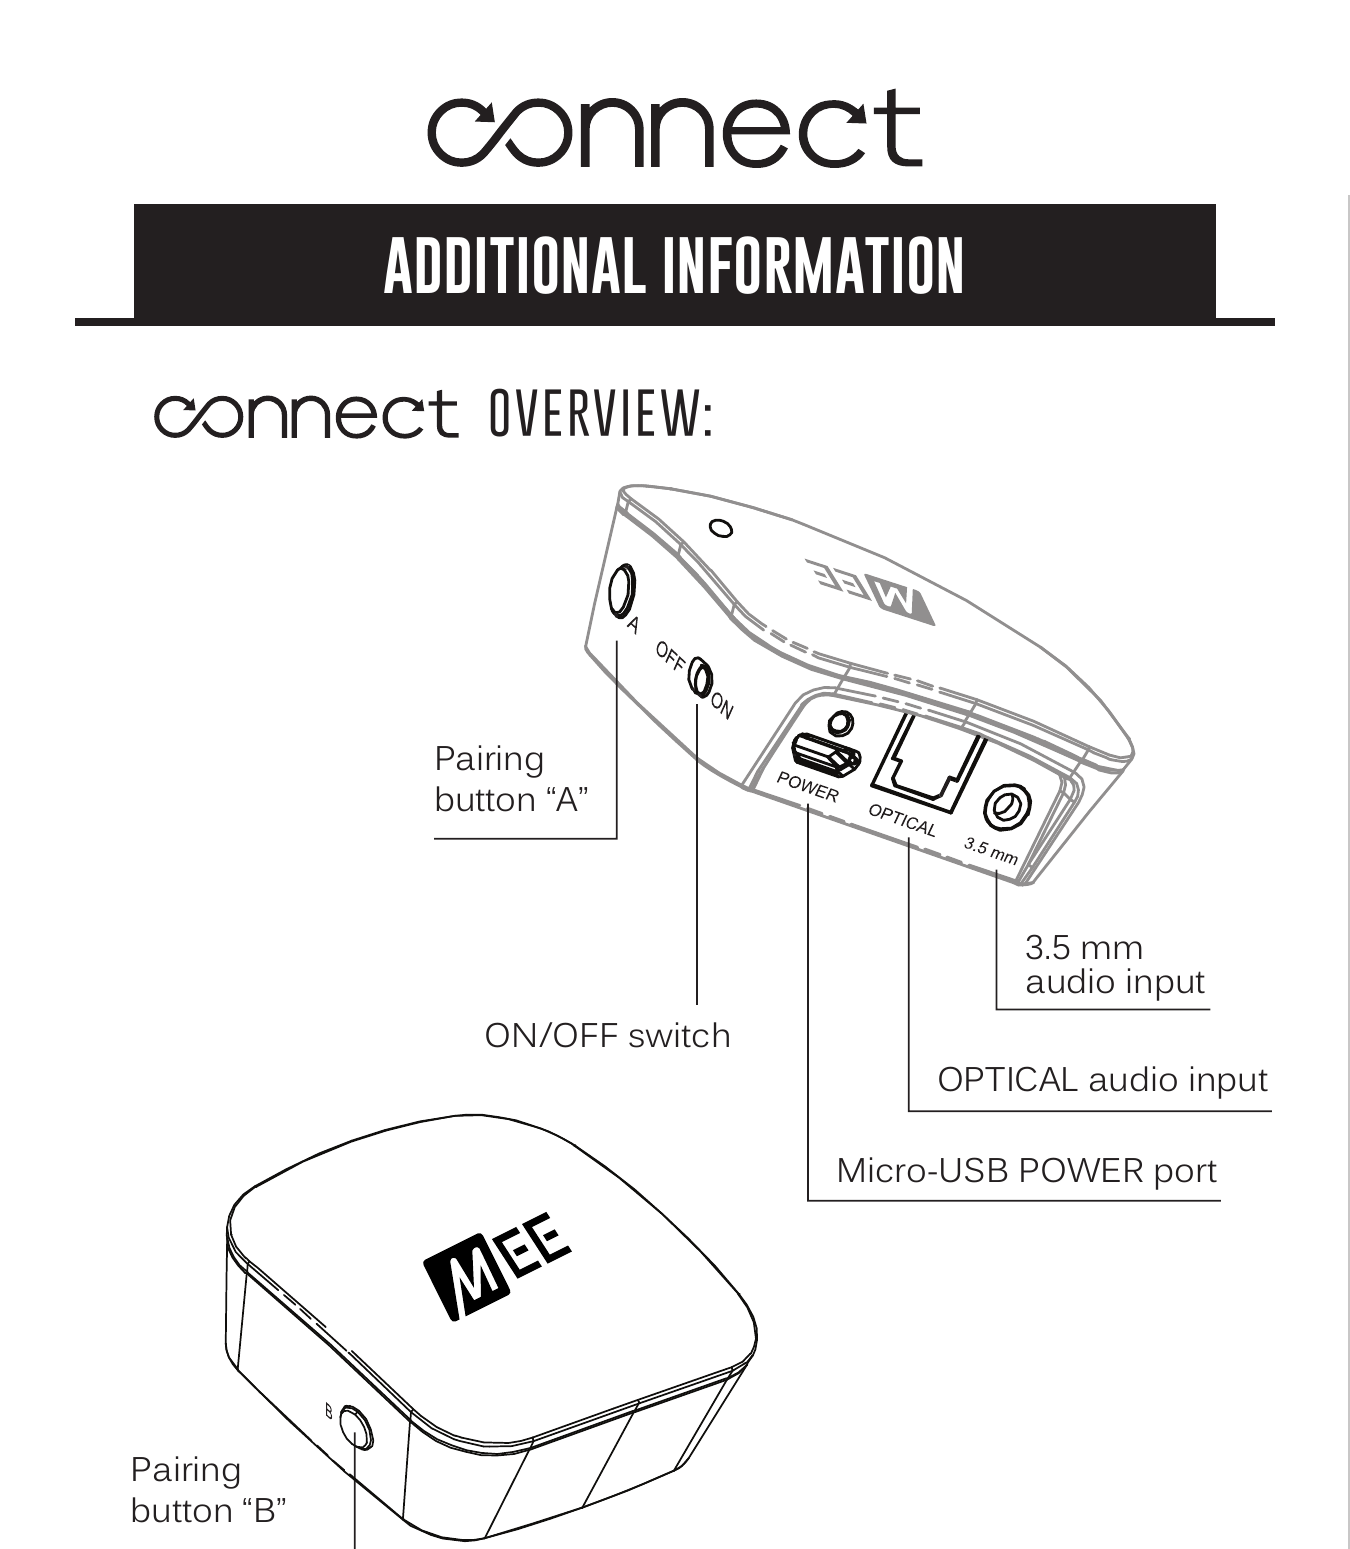
- Micro-USB POWER port
- ON/OFF switch
- Pairing button "A"
- Pairing button "B"
- OPTICAL audio input
- 3.5 mm audio input
LED Indicator Lights
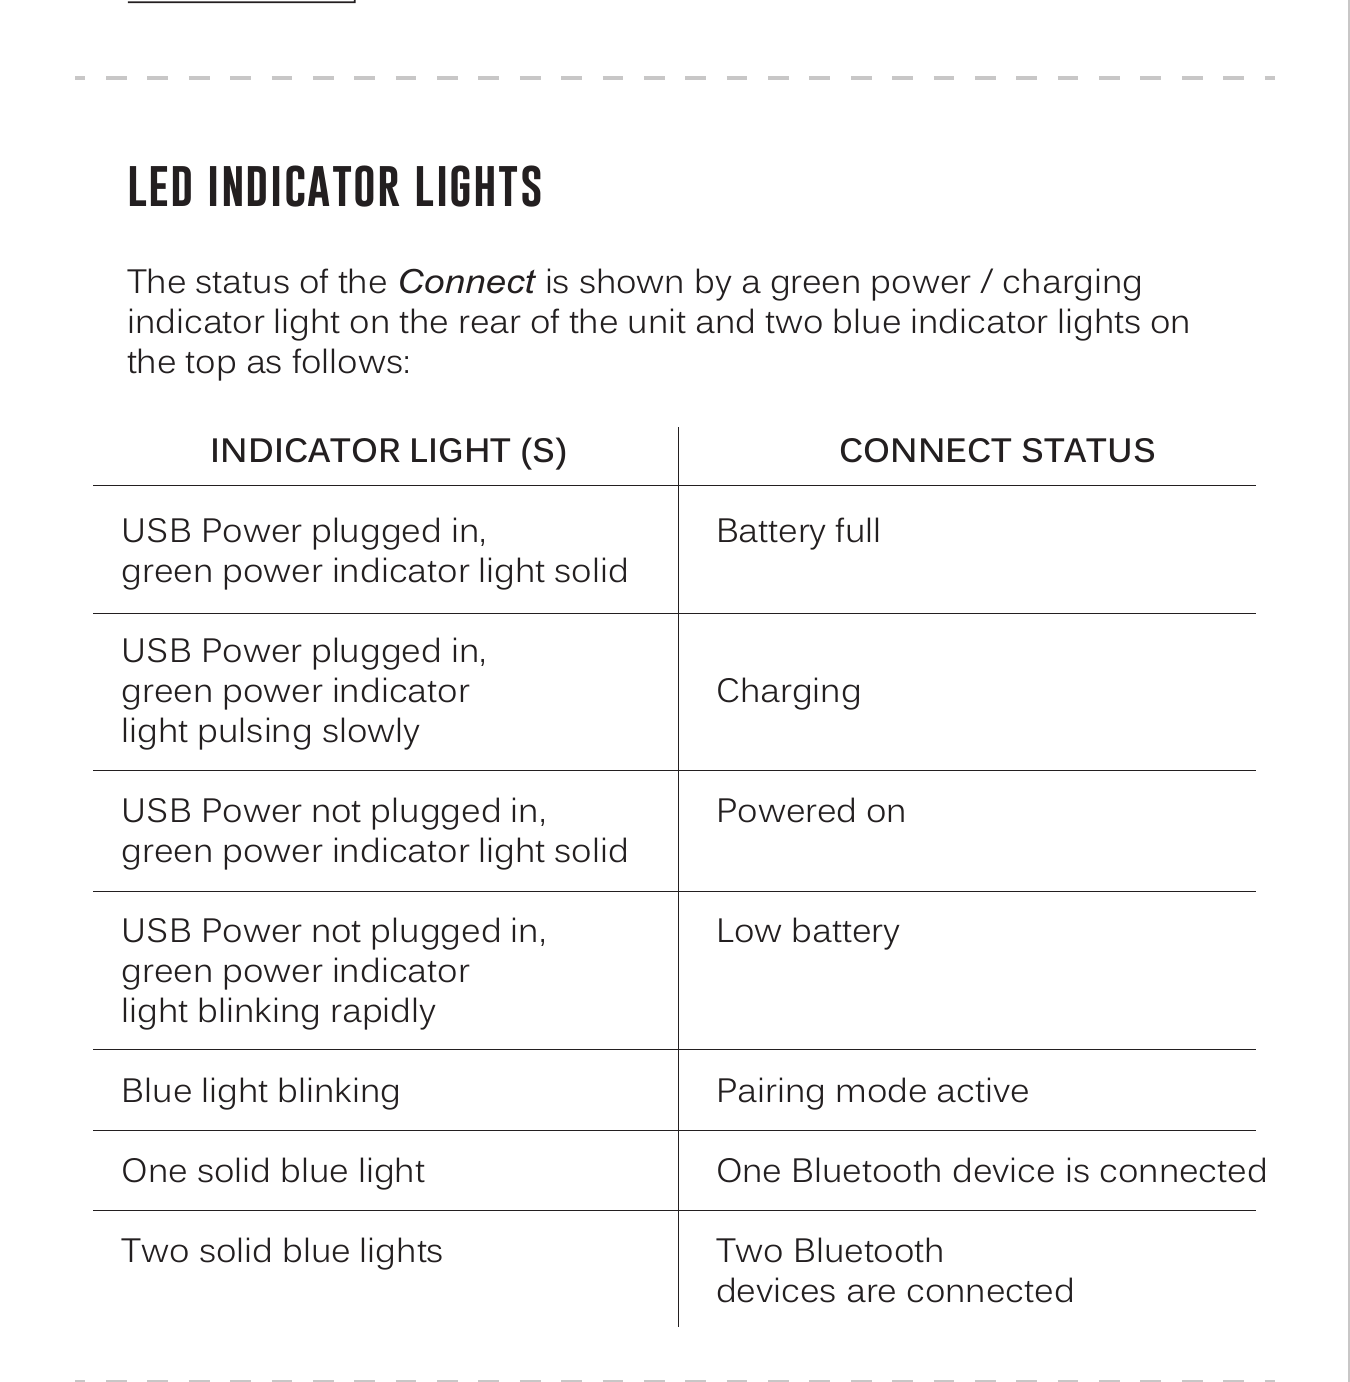
The status of the Connect is shown by a green power / charging indicator light on the rear of the unit and two blue indicator lights on the top as follows:
| Indicator Light(s) | Connect Status |
|---|---|
| USB Power plugged in, green power indicator light solid | Battery full |
| USB Power plugged in, green power indicator light pulsing slowly | Charging |
| USB Power not plugged in, green power indicator light solid | Powered on |
| USB Power not plugged in, green power indicator light blinking rapidly | Low battery |
| Blue light blinking | Pairing mode active |
| One solid blue light | One Bluetooth device is connected |
| Two solid blue lights | Two Bluetooth devices are connected |
Pair New / Additional Bluetooth Headphones
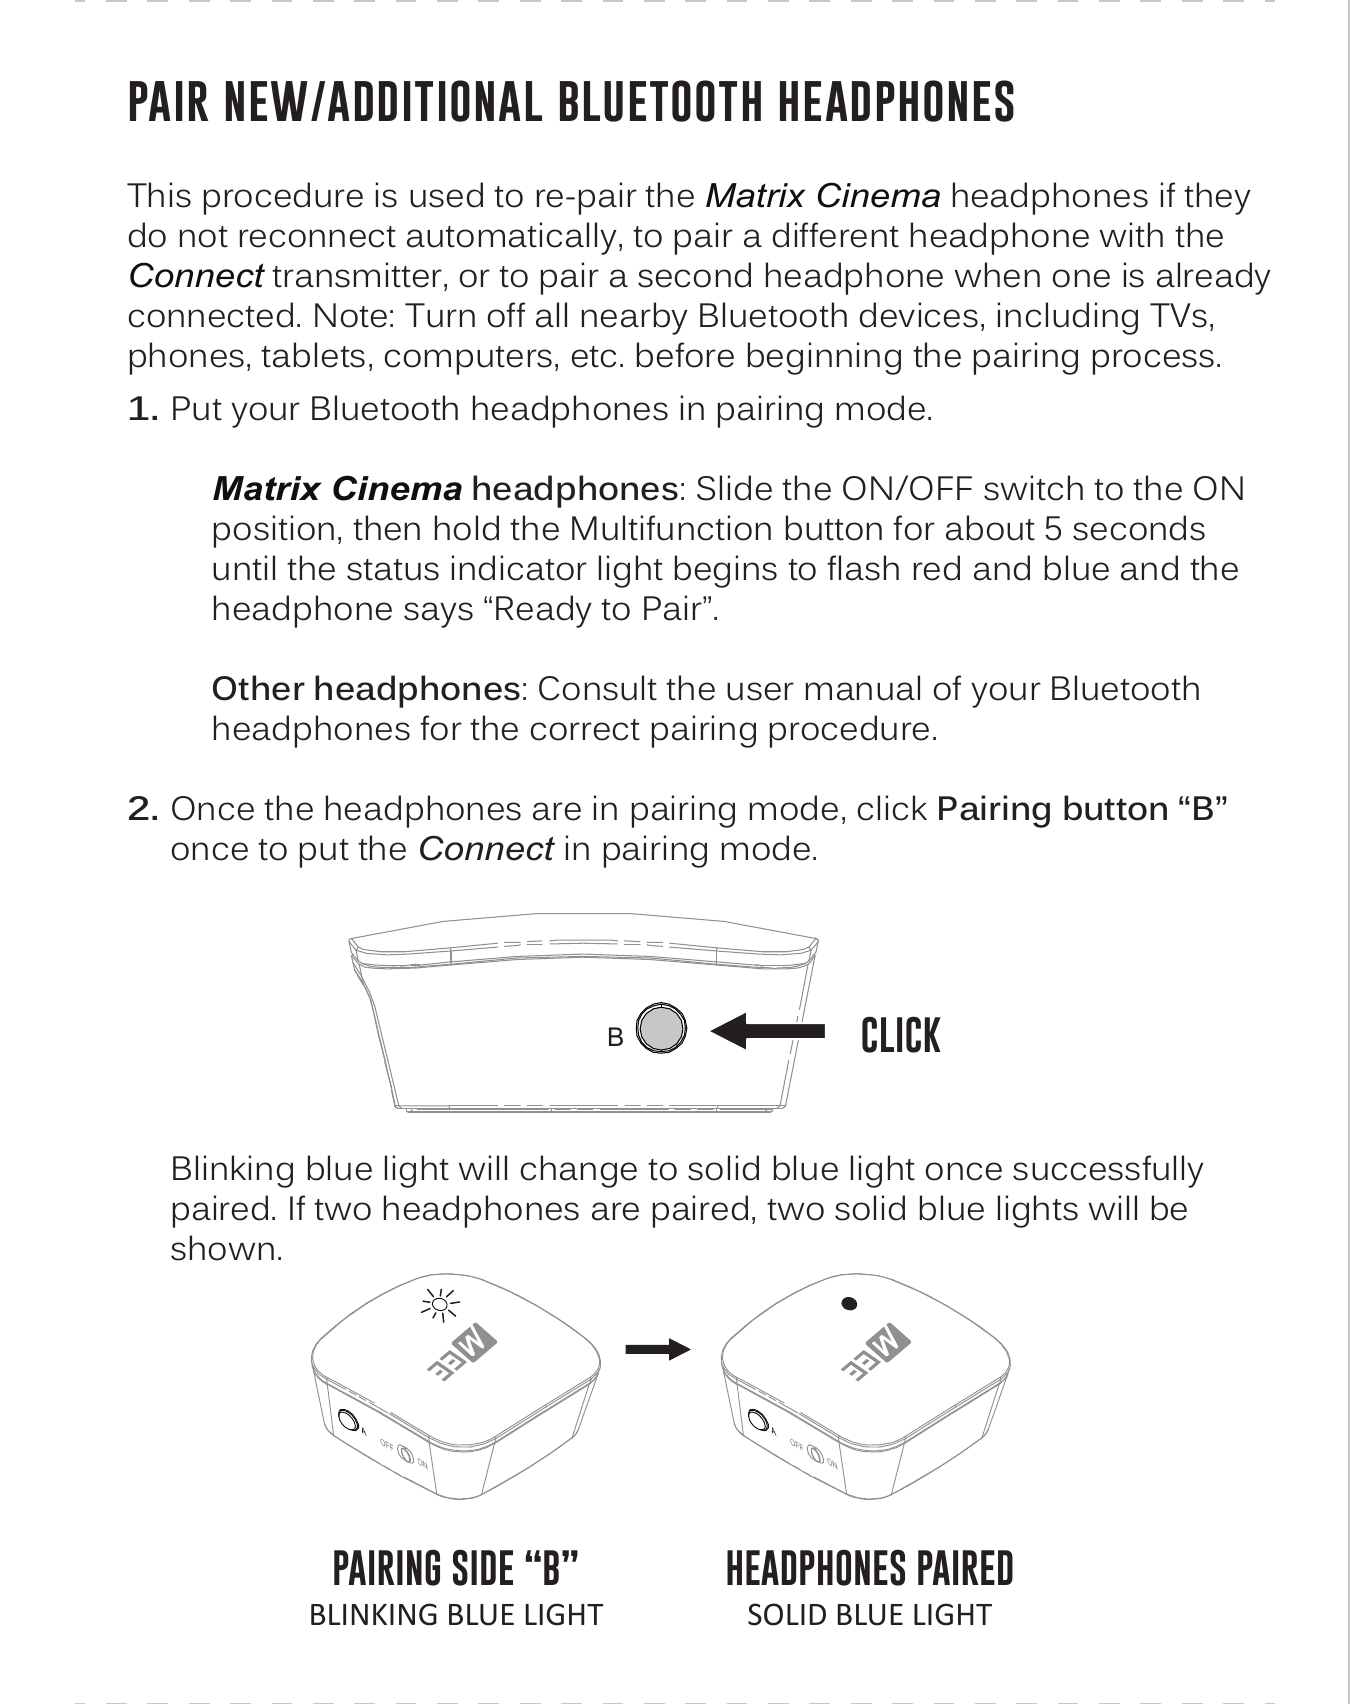
This procedure is used to re-pair the Matrix Cinema headphones if they do not reconnect automatically, to pair a different headphone with the Connect transmitter, or to pair a second headphone when one is already connected.
Note: Turn off all nearby Bluetooth devices, including TVs, phones, tablets, computers, etc. before beginning the pairing process.
-
Put your Bluetooth headphones in pairing mode.
- Matrix Cinema headphones: Slide the ON/OFF switch to the ON position, then hold the Multifunction button for about 5 seconds until the status indicator light begins to flash red and blue and the headphone says "Ready to Pair."
- Other headphones: Consult the user manual of your Bluetooth headphones for the correct pairing procedure.
- Once the headphones are in pairing mode, click Pairing button "B" once to put the Connect in pairing mode. The blinking blue light will change to solid blue once successfully paired. If two headphones are paired, two solid blue lights will be shown.
Factory Reset / Clear Memory
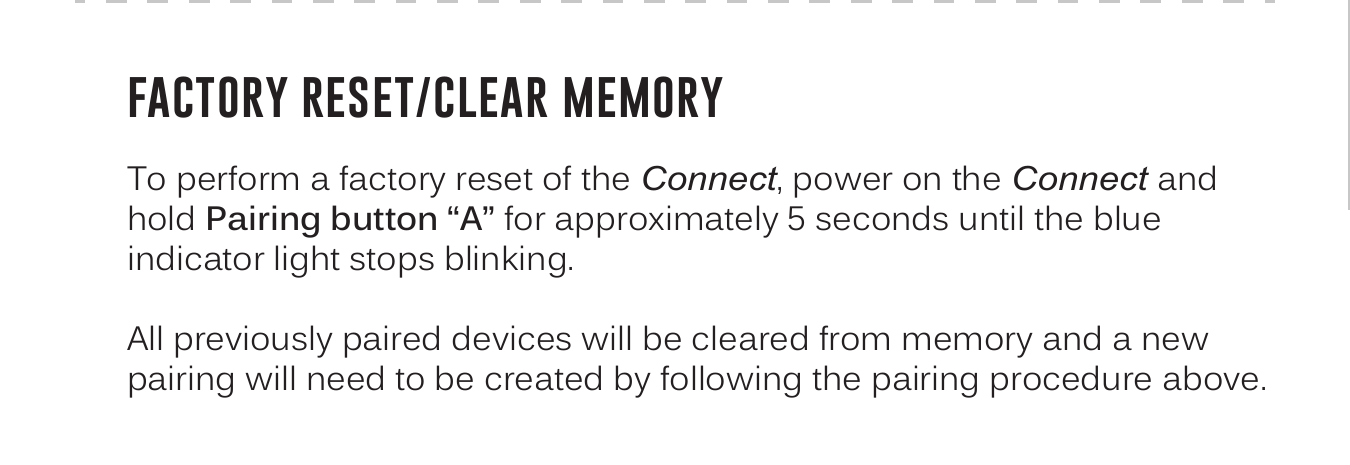
To perform a factory reset of the Connect, power on the Connect and hold Pairing button "A" for approximately 5 seconds until the blue indicator light stops blinking.
All previously paired devices will be cleared from memory and a new pairing will need to be created by following the pairing procedure above.
Matrix Cinema Headphones — Additional Information
Overview
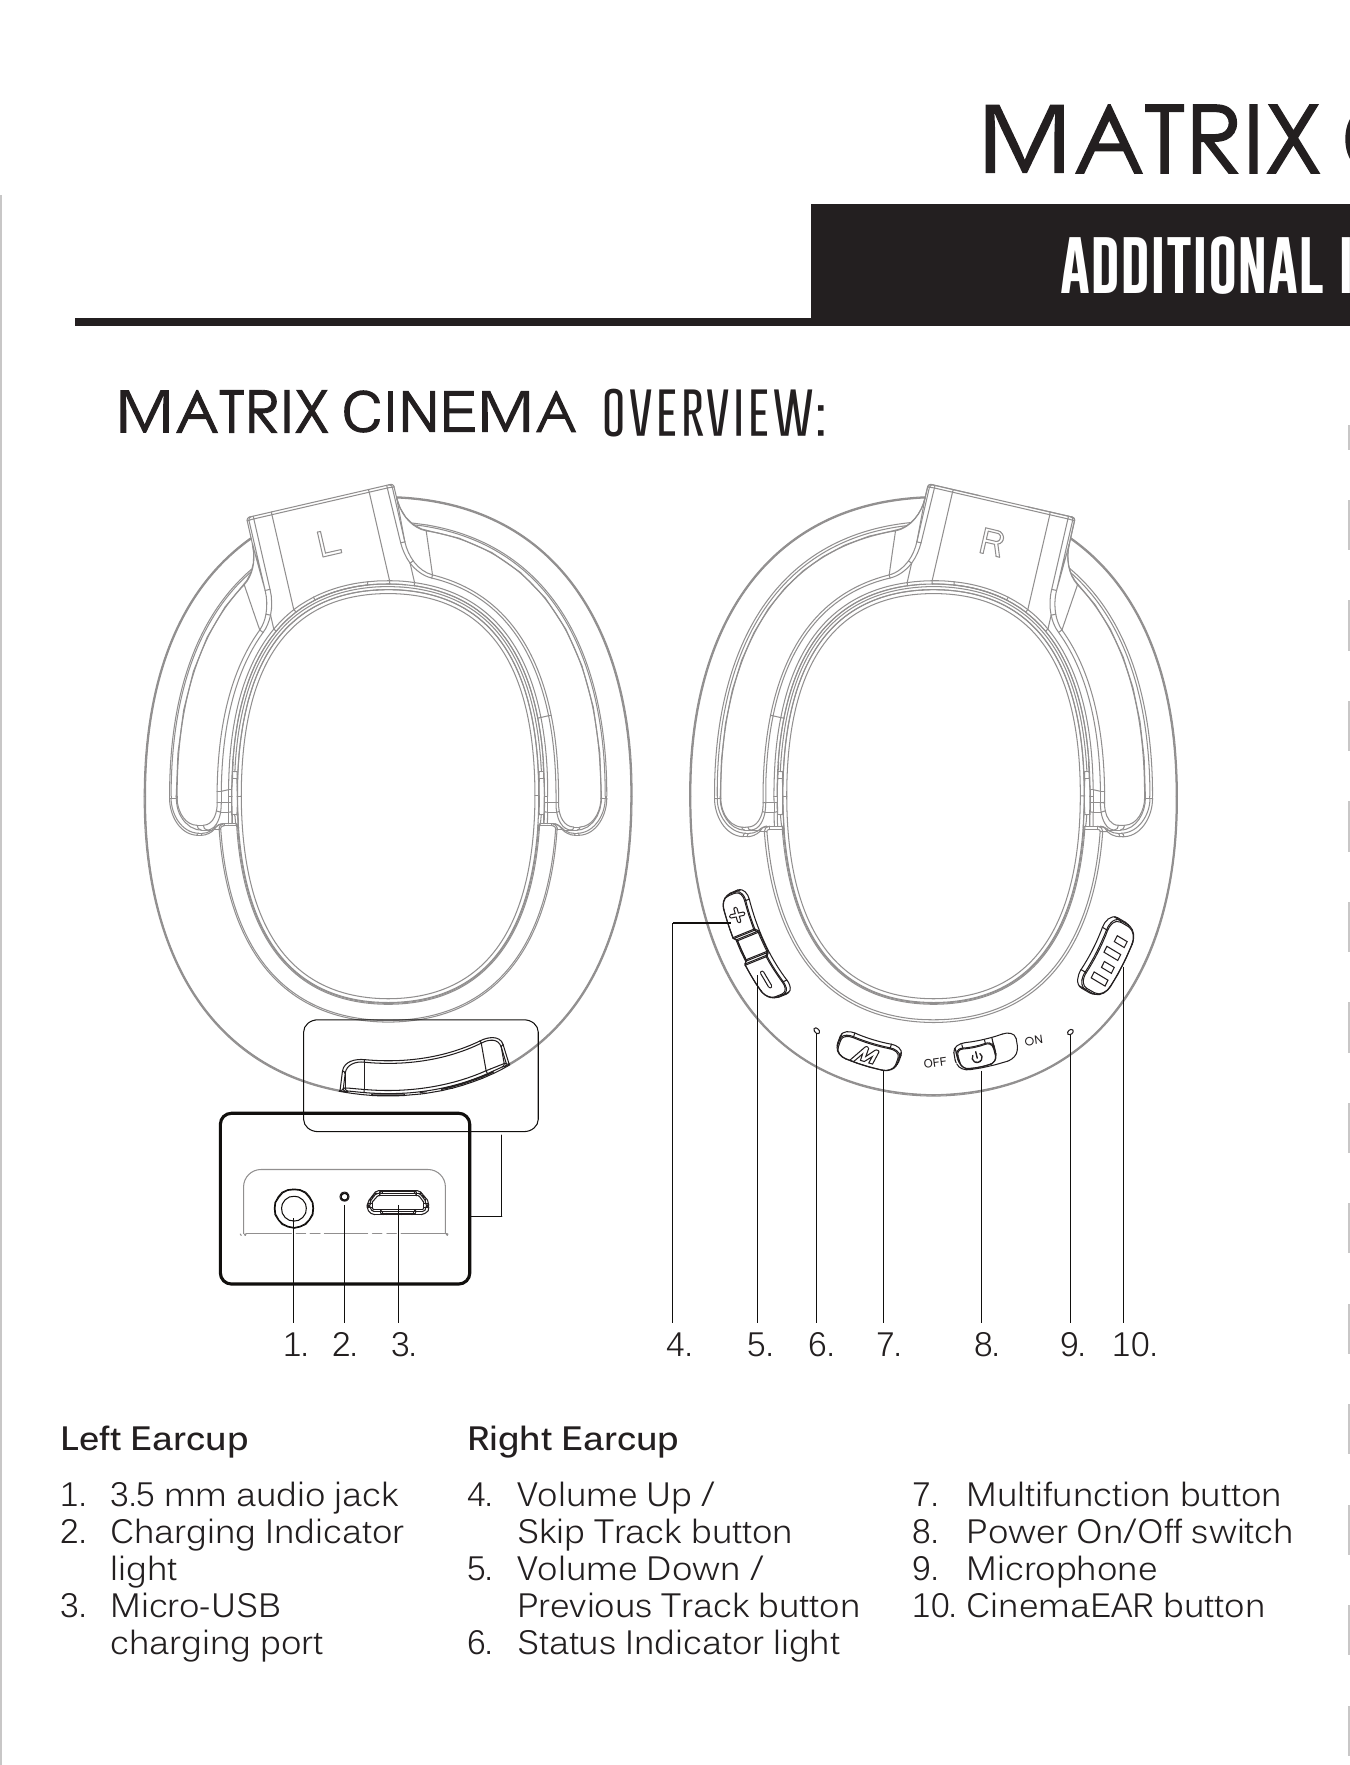
Left Earcup:
- 1. 3.5 mm audio jack
- 2. Charging Indicator light
- 3. Micro-USB charging port
Right Earcup:
- 4. Volume Up / Skip Track button
- 5. Volume Down / Previous Track button
- 6. Status Indicator light
- 7. Multifunction button
- 8. Power On/Off switch
- 9. Microphone
- 10. CinemaEAR button
Charging
The Matrix Cinema headphones should be charged roughly every 28 hours of use. Connect a micro-USB cable to the charging port of the Matrix Cinema and a powered-on computer or USB charger. Charging time is 2 hours. The red charging indicator light will turn off once fully charged. Low battery is indicated by a flashing red status indicator light and a "battery low" voice notification every five minutes.
Pairing with Other Devices
The Matrix Cinema can be used as a headset when connected to phones and tablets. It will first need to be paired with each device.
To pair the Matrix Cinema with a new device, power it on and put it in pairing mode by holding the Power / Multifunction button for about 5 seconds until the status indicator light begins to flash red and blue in an alternating pattern and the headphone says "Ready to Pair."
Open the Bluetooth menu on the device you wish to pair (usually located in Settings → Bluetooth). If needed, select "search for devices," "add new device," or "refresh." Select "MEE audio Matrix Cinema" and allow pairing to complete.
It is only necessary to pair your headphones once with each new device.
Controls with Phones and Tablets
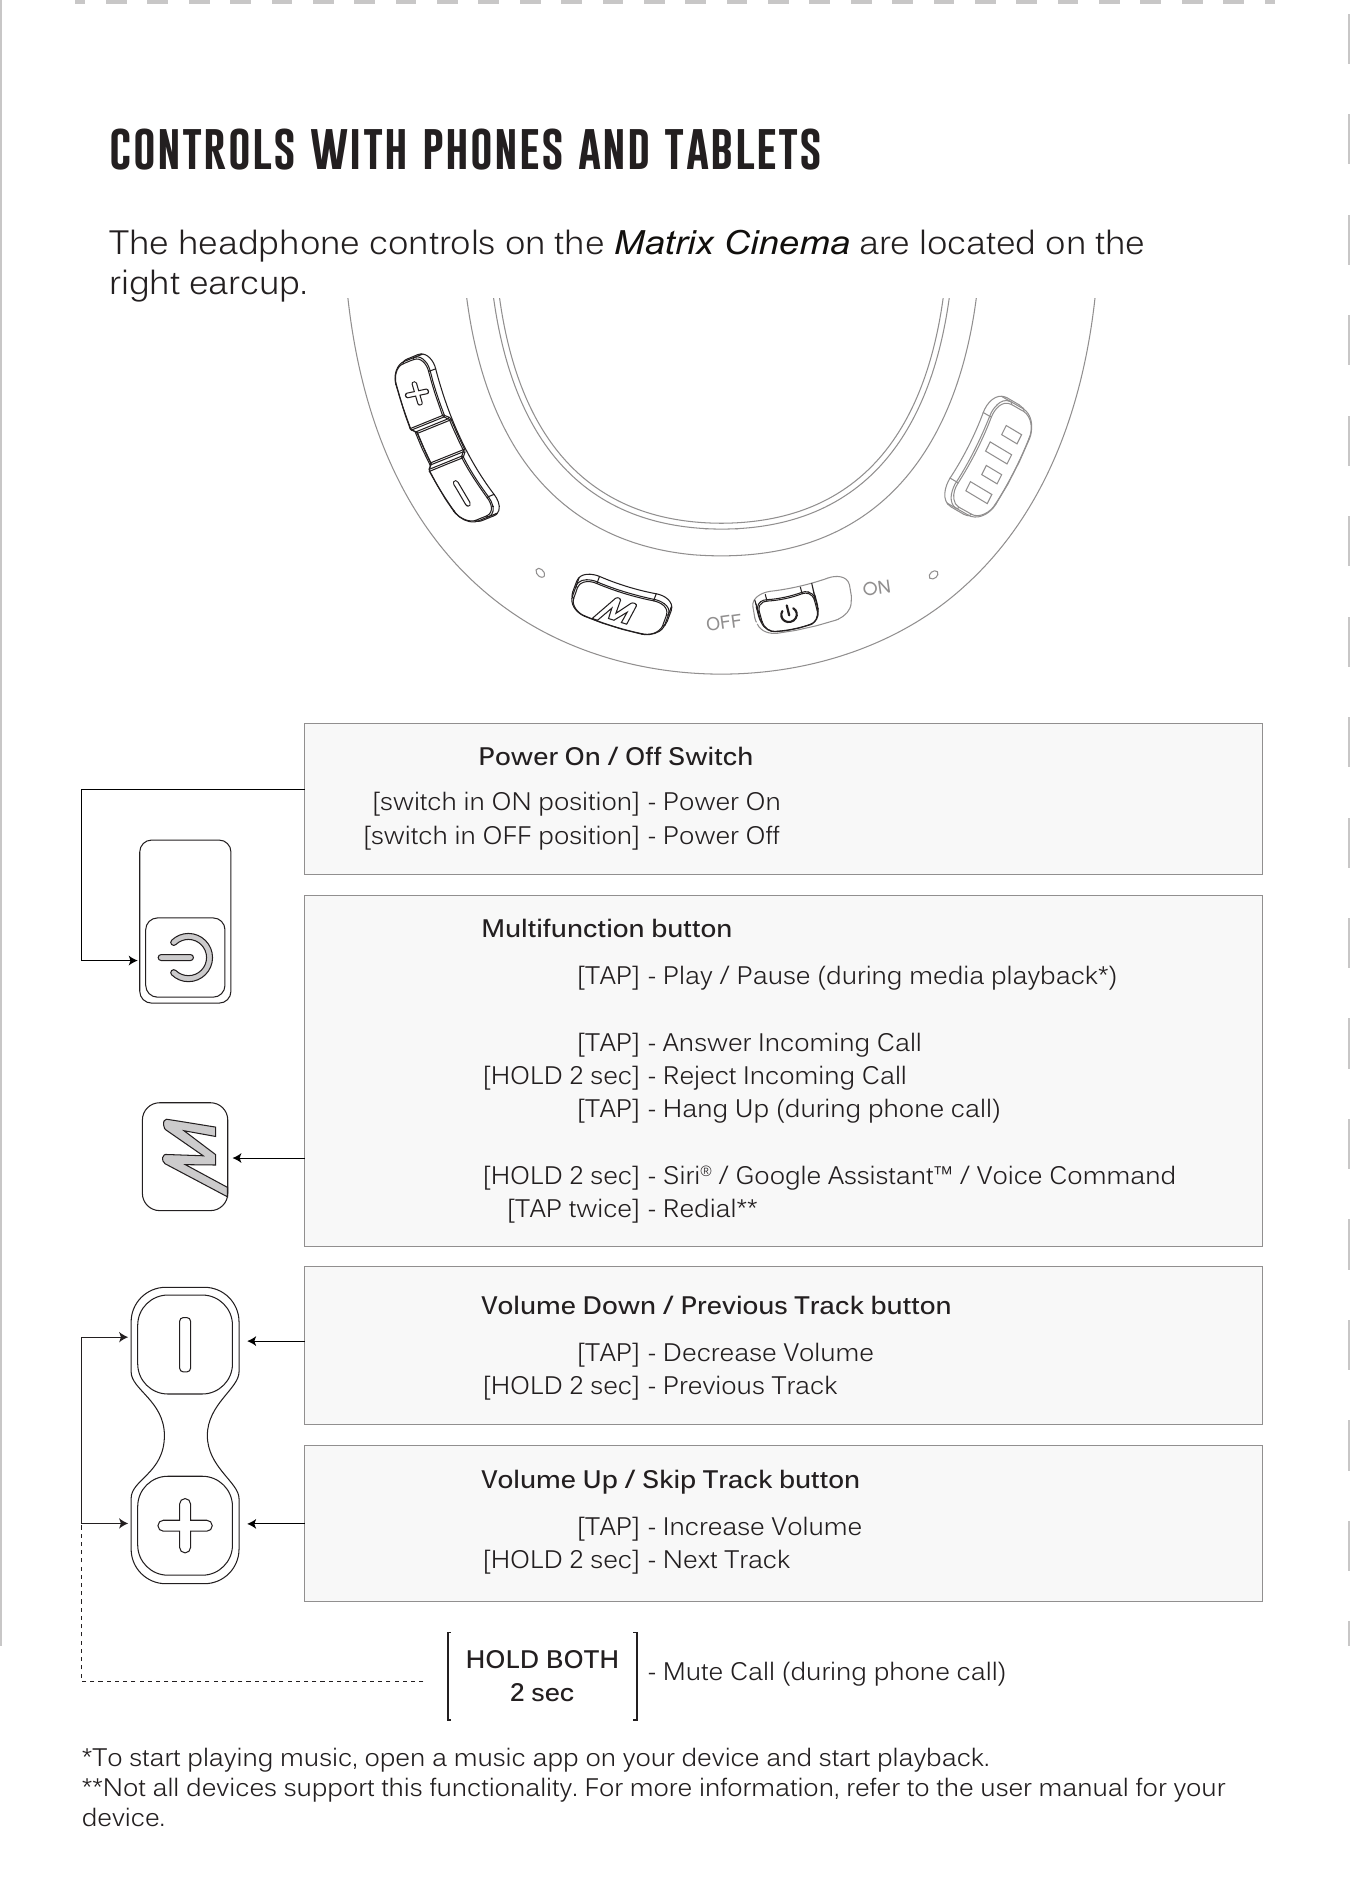
The headphone controls on the Matrix Cinema are located on the right earcup.
Volume Down / Previous Track button
- [TAP] — Decrease Volume
- [HOLD 2 sec] — Previous Track
Volume Up / Skip Track button
- [TAP] — Increase Volume
- [HOLD 2 sec] — Next Track
Multifunction button
- [TAP] — Play / Pause (during media playback)
- [TAP] — Answer Incoming Call
- [HOLD 2 sec] — Reject Incoming Call
- [TAP] — Hang Up (during phone call)
- [HOLD 2 sec] — Siri® / Google Assistant™ / Voice Command
- [TAP twice] — Redial
- [HOLD BOTH Multifunction + Volume Down, 2 sec] — Mute Call (during phone call)
Power On / Off Switch
- Switch in ON position → Power On
- Switch in OFF position → Power Off
Changing Audio Mode (CinemaEAR)
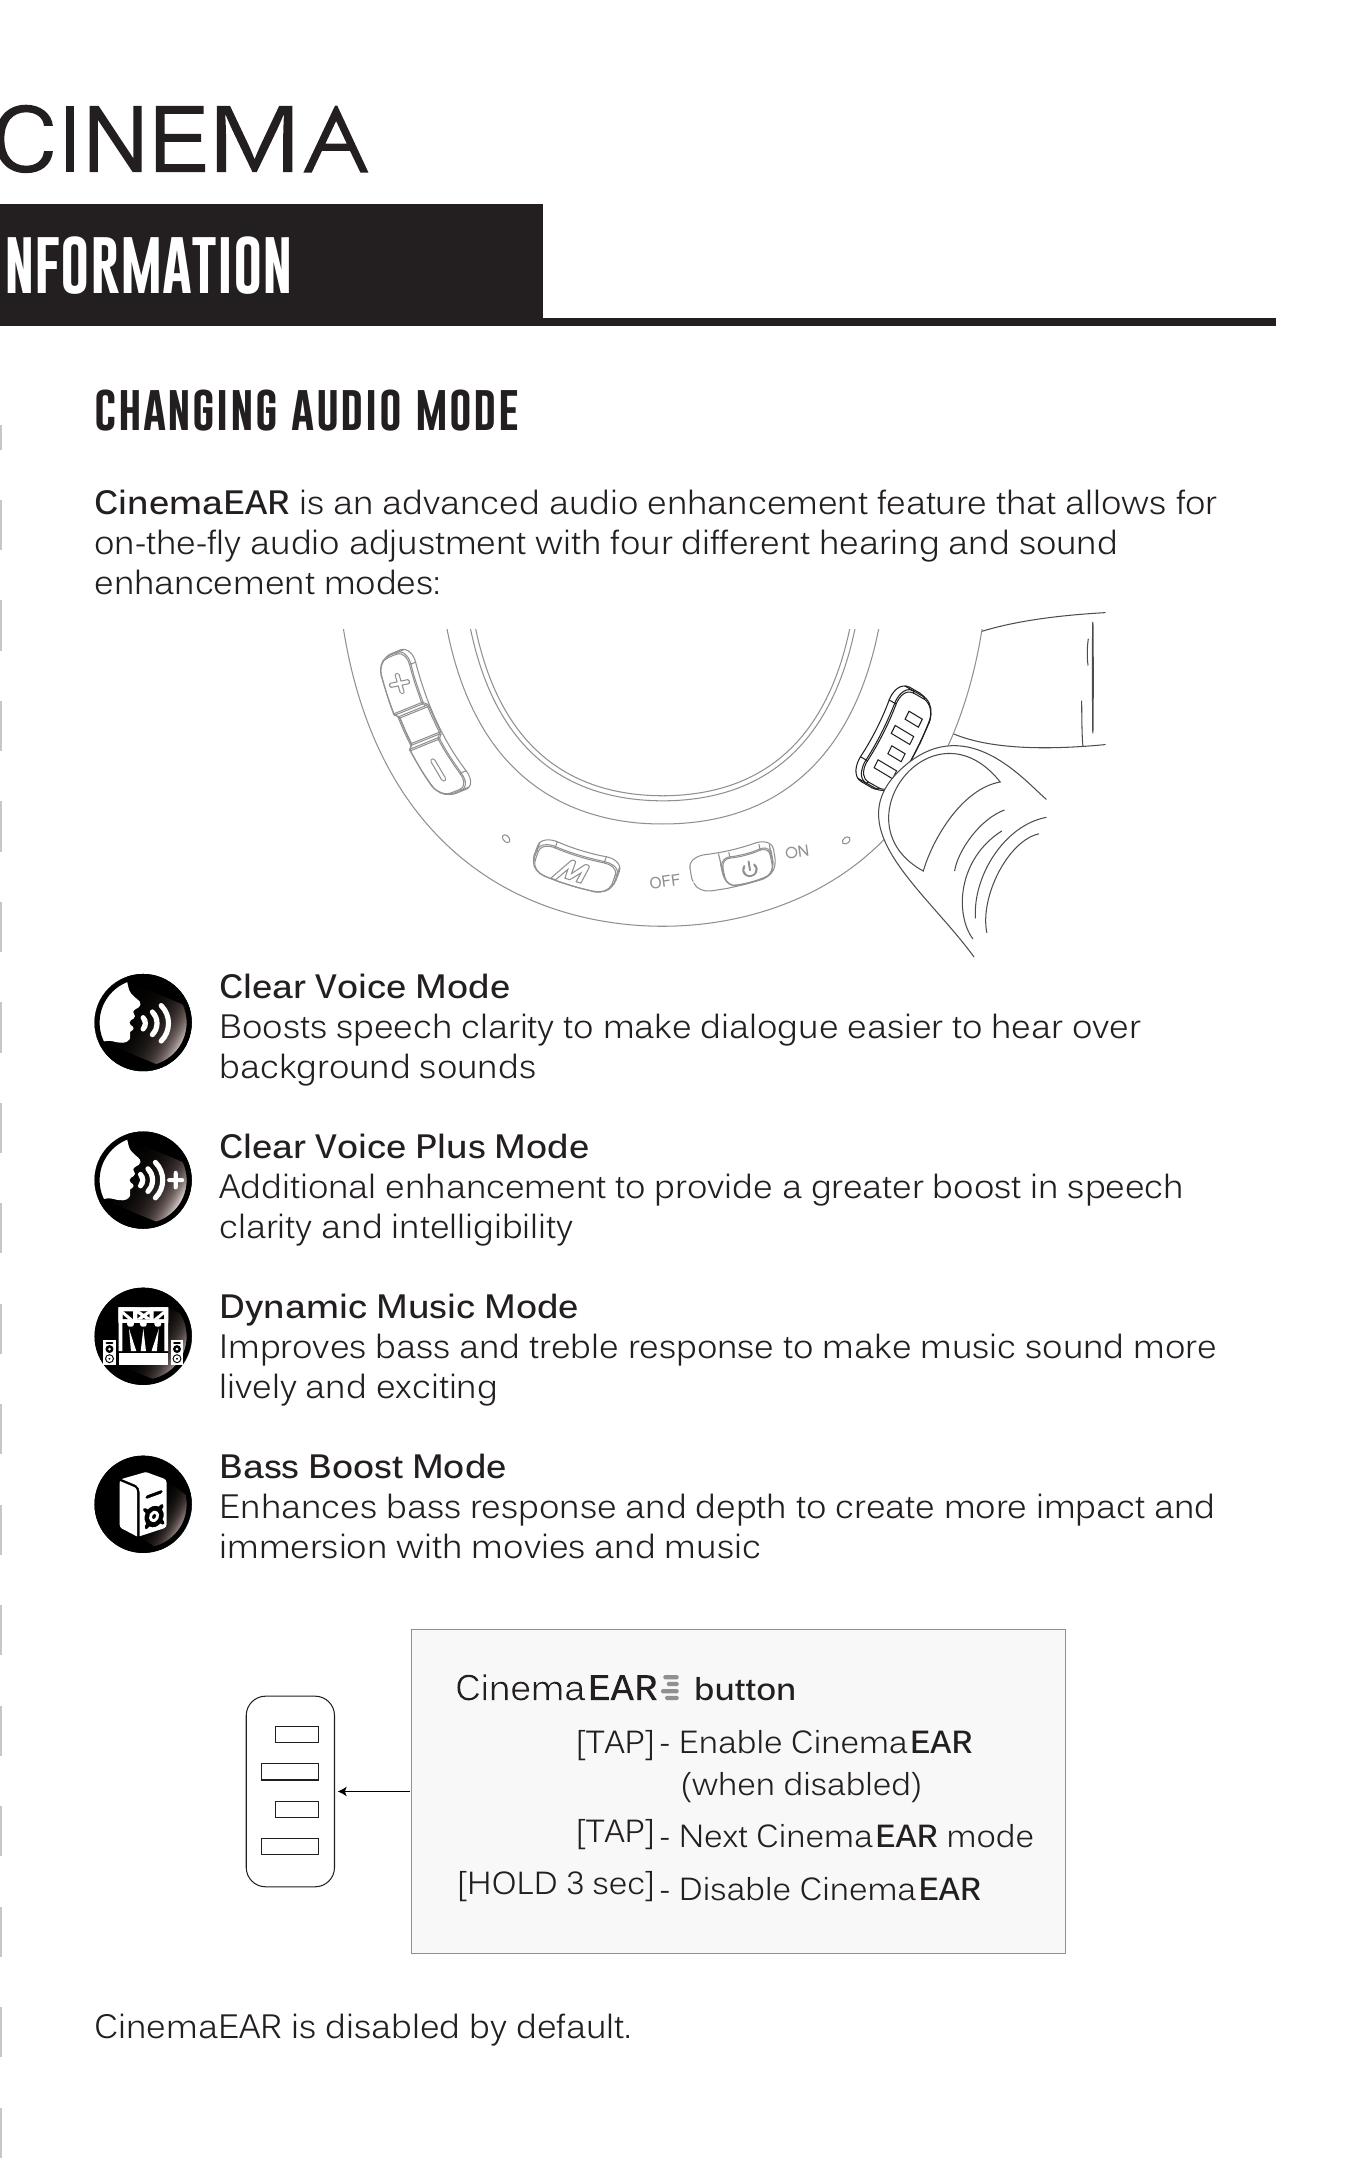
CinemaEAR is an advanced audio enhancement feature that allows for on-the-fly audio adjustment with four different hearing and sound enhancement modes:
- Clear Voice Mode: Boosts speech clarity to make dialogue easier to hear over background sounds.
- Clear Voice Plus Mode: Additional enhancement to provide a greater boost in speech clarity and intelligibility.
- Dynamic Music Mode: Improves bass and treble response to make music sound more lively and exciting.
- Bass Boost Mode: Enhances bass response and depth to create more impact and immersion with movies and music.
CinemaEAR is disabled by default.
CinemaEAR button controls:
- [TAP] — Enable CinemaEAR (when disabled)
- [TAP] — Next CinemaEAR mode
- [HOLD 3 sec] — Disable CinemaEAR
Disabling Audio Prompts
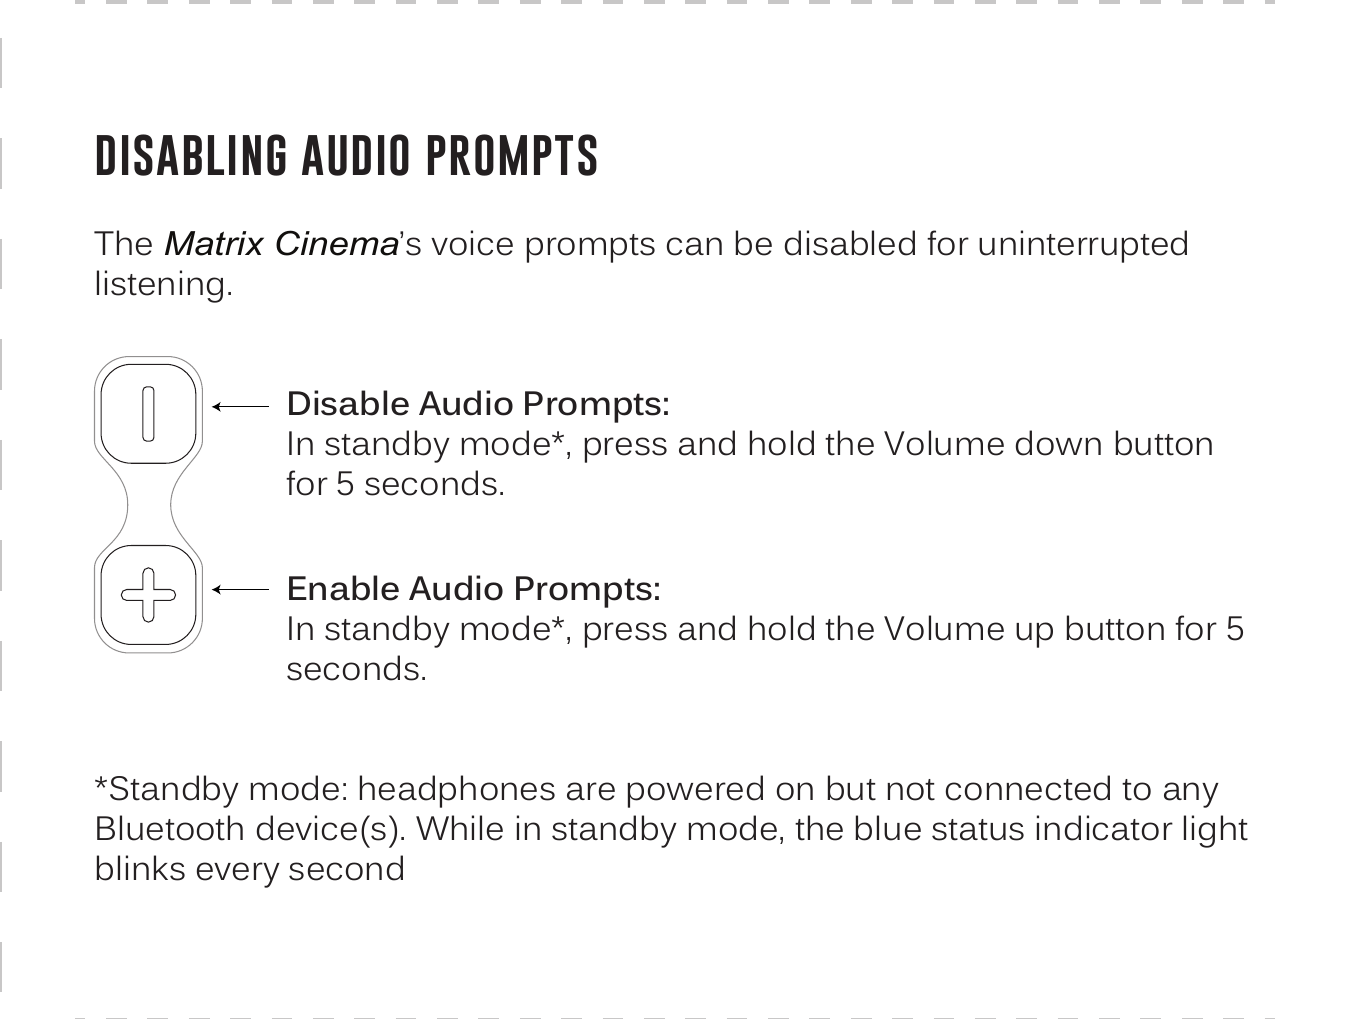
The Matrix Cinema's voice prompts can be disabled for uninterrupted listening.
- Disable Audio Prompts: In standby mode*, press and hold the Volume down button for 5 seconds.
- Enable Audio Prompts: In standby mode*, press and hold the Volume up button for 5 seconds.
*Standby mode: headphones are powered on but not connected to any Bluetooth device(s). While in standby mode, the blue status indicator light blinks every second.
↑ Back to topDisabling Status Indicator Light
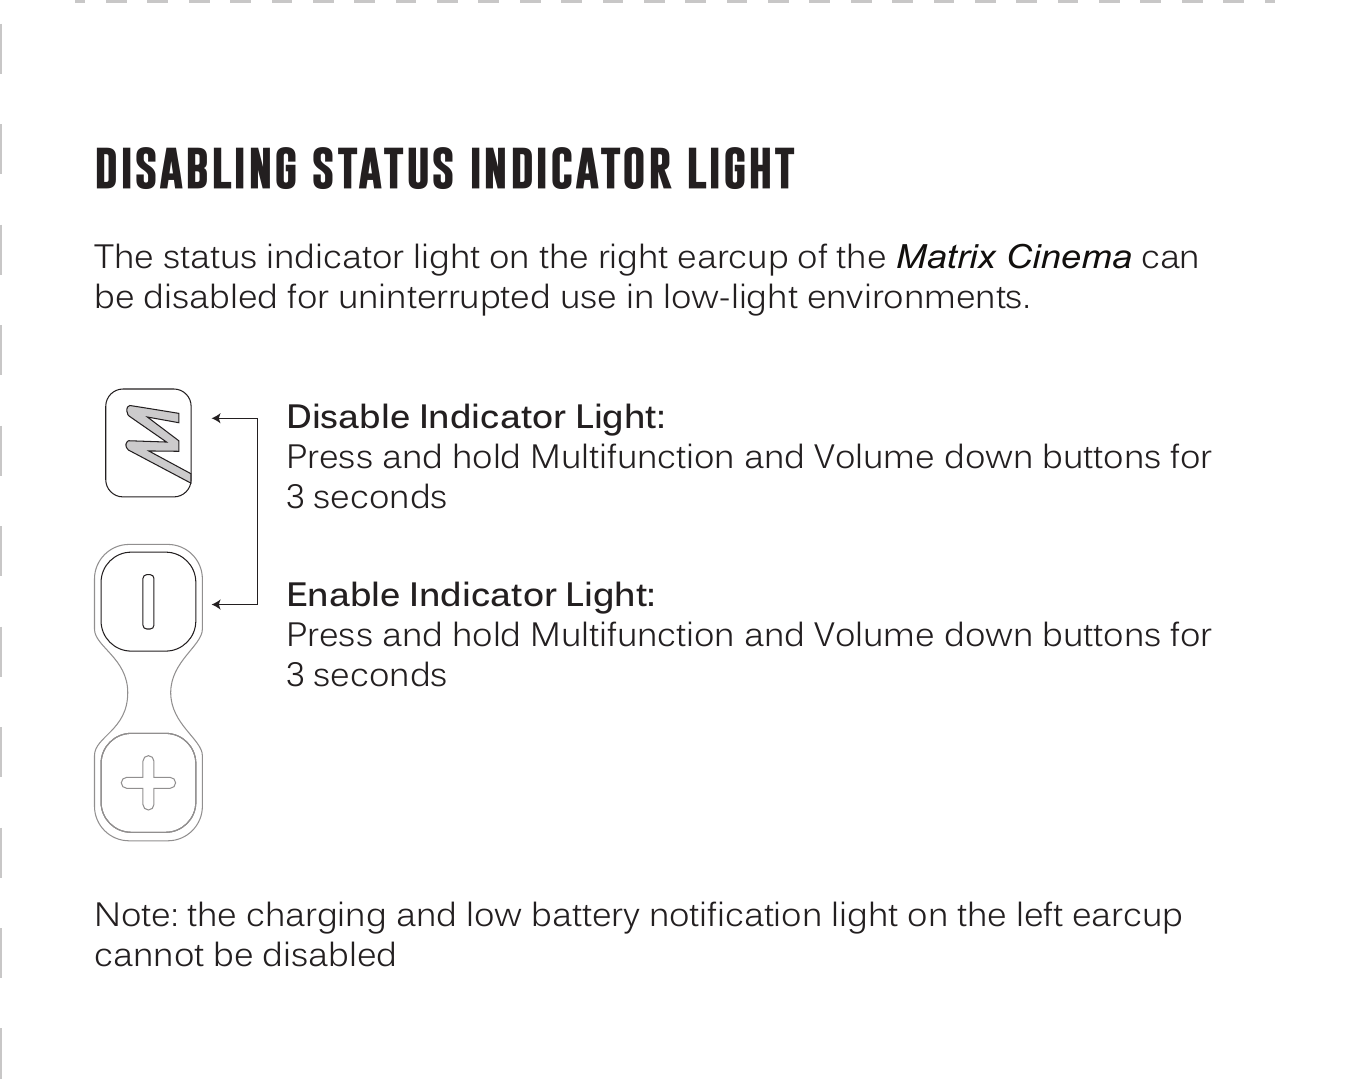
The status indicator light on the right earcup of the Matrix Cinema can be disabled for uninterrupted use in low-light environments.
- Disable Indicator Light: Press and hold Multifunction and Volume down buttons for 3 seconds.
- Enable Indicator Light: Press and hold Multifunction and Volume down buttons for 3 seconds.
Note: The charging and low battery notification light on the left earcup cannot be disabled.
Factory Reset (Matrix Cinema Headphones)
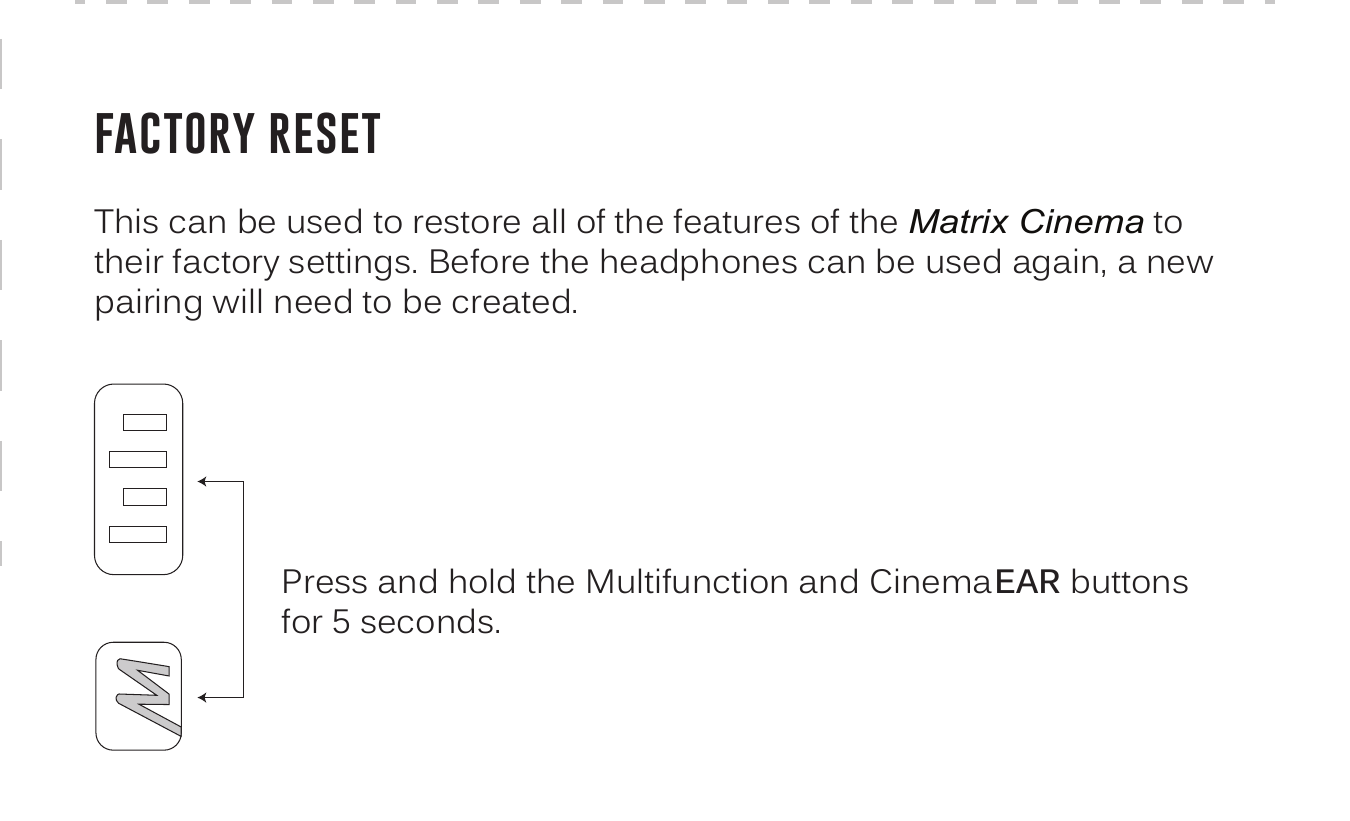
This can be used to restore all of the features of the Matrix Cinema to their factory settings. Before the headphones can be used again, a new pairing will need to be created.
Press and hold the Multifunction and CinemaEAR buttons for 5 seconds.
↑ Back to topAdditional Support
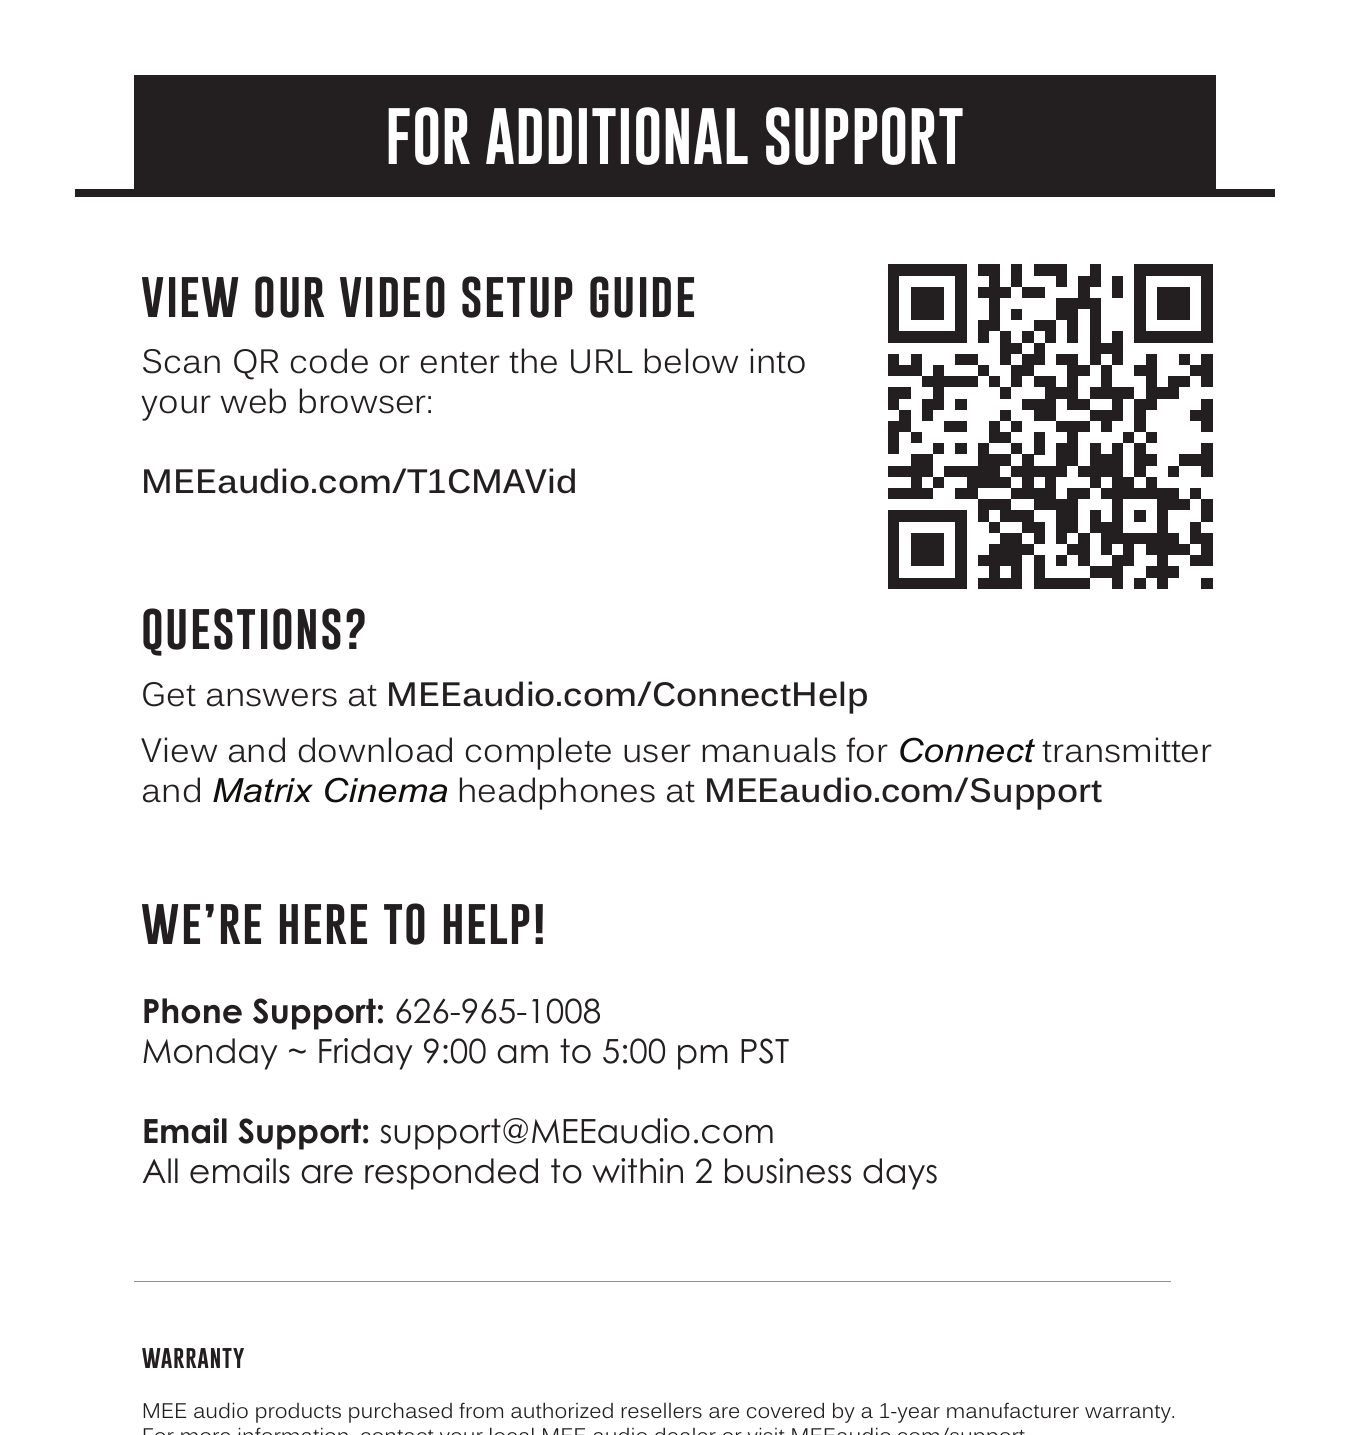
Video Setup Guide
View our video setup guide at MEEaudio.com/T1CMAVid or by scanning the QR code in the image above.
Questions?
Get answers at MEEaudio.com/ConnectHelp
View and download complete user manuals for Connect transmitter and Matrix Cinema headphones at MEEaudio.com/Support
We're Here to Help!
Phone Support: 626-965-1008
Monday – Friday 9:00 am to 5:00 pm PST
Email Support: support@MEEaudio.com
All emails are responded to within 2 business days.
Warranty & Warnings
Warranty
MEE audio products purchased from authorized resellers are covered by a 1-year manufacturer warranty. For more information, contact your local MEE audio dealer or visit MEEaudio.com/support.
Warnings
⚠ Using headphones at high to moderate volumes for extended periods of time will result in permanent hearing damage. Keep volume levels moderate to low at all times. Do not use while driving a car, cycling, operating machinery, or performing other activities that require hearing surrounding sounds.
- Keep the device and packaging out of reach of children.
- This device is designed to operate within its defined design limits. Misuse may result in electric shock or fire.
- Danger of explosion or fire if batteries are damaged. Keep away from direct sunlight, naked flames, flammable gasses, or heat sources such as radiators or stoves.
- Battery performance will be severely decreased when stored in extreme temperatures: below −10°C/14°F or above 45°C/113°F including direct sunlight.
- The lifetime of the battery will be significantly reduced if your device is not charged for a long time. Charge at least once a month.
- Clean with a soft, slightly damp cloth. Do not use chemical cleaners.
- There are no user replaceable/reparable parts in this device. Disassembling it will void your warranty.
- Do not expose the device to liquids. If the device comes in contact with liquids, quickly wipe away. If submerged in water, do not turn the device on until completely dried. Liquid submersion voids the warranty.
- Do not use around flammable gasses as fire or explosion may occur.
- Only use attachments/accessories specified by the manufacturer.
- Changes or modifications to this unit not expressly approved by MEE audio could void the user's authority to operate the equipment.
Compliance & FCC Information
Compliance Information
This device complies with part 15 of the FCC Rules. Operation is subject to the following two conditions: (1) This device may not cause harmful interference, and (2) this device must accept any interference received, including interference that may cause undesired operation.
FCC Rules
This equipment has been tested and found to comply with the limits for a Class B digital device, pursuant to part 15 of the FCC Rules. These limits are designed to provide reasonable protection against harmful interference in a residential installation.
If this equipment does cause harmful interference to radio or television reception, the user is encouraged to try to correct the interference by one or more of the following measures:
- Relocate the receiving antenna.
- Increase the separation between equipment and receiver.
- Connect the equipment into an outlet on a circuit different from that to which the receiver is connected.
- Consult the dealer or an experienced radio/TV technician for help.
Disposal and Recycling
Dispose of this product in accordance with all local laws and regulations. Because this product contains electronic components and a battery, it must be disposed of separately from household waste. Contact local authorities to learn about disposal and recycling options.
MEE audio and its logo are registered trademarks of S2E, Inc. All rights reserved. The Bluetooth® word mark and logos are registered trademarks owned by Bluetooth SIG, Inc. and any use of such marks by MEE audio is under license. Qualcomm aptX is a product of Qualcomm Technologies, Inc. and/or its subsidiaries. Qualcomm is a trademark of Qualcomm Incorporated. aptX is a trademark of Qualcomm Technologies International, Ltd. Siri® and Apple TV® are registered trademarks of Apple Inc. Google Assistant™ is a trademark of Google Inc.
↑ Back to top